By: Team SE-EDU Since: Jun 2016 Licence: MIT
1. Setting up
1.1. Prerequisites
-
JDK
9or laterJDK 10on Windows will fail to run tests in headless mode due to a JavaFX bug. Windows developers are highly recommended to use JDK9. -
IntelliJ IDE
IntelliJ by default has Gradle and JavaFx plugins installed.
Do not disable them. If you have disabled them, go toFile>Settings>Pluginsto re-enable them.
1.2. Setting up the project in your computer
-
Fork this repo, and clone the fork to your computer
-
Open IntelliJ (if you are not in the welcome screen, click
File>Close Projectto close the existing project dialog first) -
Set up the correct JDK version for Gradle
-
Click
Configure>Project Defaults>Project Structure -
Click
New…and find the directory of the JDK
-
-
Click
Import Project -
Locate the
build.gradlefile and select it. ClickOK -
Click
Open as Project -
Click
OKto accept the default settings -
Open a console and run the command
gradlew processResources(Mac/Linux:./gradlew processResources). It should finish with theBUILD SUCCESSFULmessage.
This will generate all resources required by the application and tests. -
Open
XmlAdaptedWish.javaandMainWindow.javaand check for any code errors-
Due to an ongoing issue with some of the newer versions of IntelliJ, code errors may be detected even if the project can be built and run successfully
-
To resolve this, place your cursor over any of the code section highlighted in red. Press ALT+ENTER, and select
Add '--add-modules=…' to module compiler optionsfor each error
-
-
Repeat this for the test folder as well (e.g. check
XmlUtilTest.javaandHelpWindowTest.javafor code errors, and if so, resolve it the same way)
1.3. Verifying the setup
-
Run the
seedu.url.MainAppand try a few commands -
Run the tests to ensure they all pass.
1.4. Configurations to do before writing code
1.4.1. Configuring the coding style
This project follows oss-generic coding standards. IntelliJ’s default style is mostly compliant with ours but it uses a different import order from ours. To rectify,
-
Go to
File>Settings…(Windows/Linux), orIntelliJ IDEA>Preferences…(macOS) -
Select
Editor>Code Style>Java -
Click on the
Importstab to set the order-
For
Class count to use import with '*'andNames count to use static import with '*': Set to999to prevent IntelliJ from contracting the import statements -
For
Import Layout: The order isimport static all other imports,import java.*,import javax.*,import org.*,import com.*,import all other imports. Add a<blank line>between eachimport
-
Optionally, you can follow the UsingCheckstyle.adoc document to configure Intellij to check style-compliance as you write code.
1.4.2. Updating documentation to match your fork
After forking the repo, the documentation will still have the SE-EDU branding and refer to the CS2103-AY1819S1-T16-1/main repo.
If you plan to develop this fork as a separate product (i.e. instead of contributing to CS2103-AY1819S1-T16-1/main), you should do the following:
-
Configure the site-wide documentation settings in
build.gradle, such as thesite-name, to suit your own project. -
Replace the URL in the attribute
repoURLinDeveloperGuide.adocandUserGuide.adocwith the URL of your fork.
1.4.3. Setting up CI
Set up Travis to perform Continuous Integration (CI) for your fork. See UsingTravis.adoc to learn how to set it up.
After setting up Travis, you can optionally set up coverage reporting for your team fork (see UsingCoveralls.adoc).
| Coverage reporting could be useful for a team repository that hosts the final version but it is not that useful for your personal fork. |
Optionally, you can set up AppVeyor as a second CI (see UsingAppVeyor.adoc).
| Having both Travis and AppVeyor ensures your App works on both Unix-based platforms and Windows-based platforms (Travis is Unix-based and AppVeyor is Windows-based) |
1.4.4. Getting started with coding
When you are ready to start coding,
-
Get some sense of the overall design by reading Section 2.1, “Architecture”.
-
Take a look at [GetStartedProgramming].
2. Design
2.1. Architecture
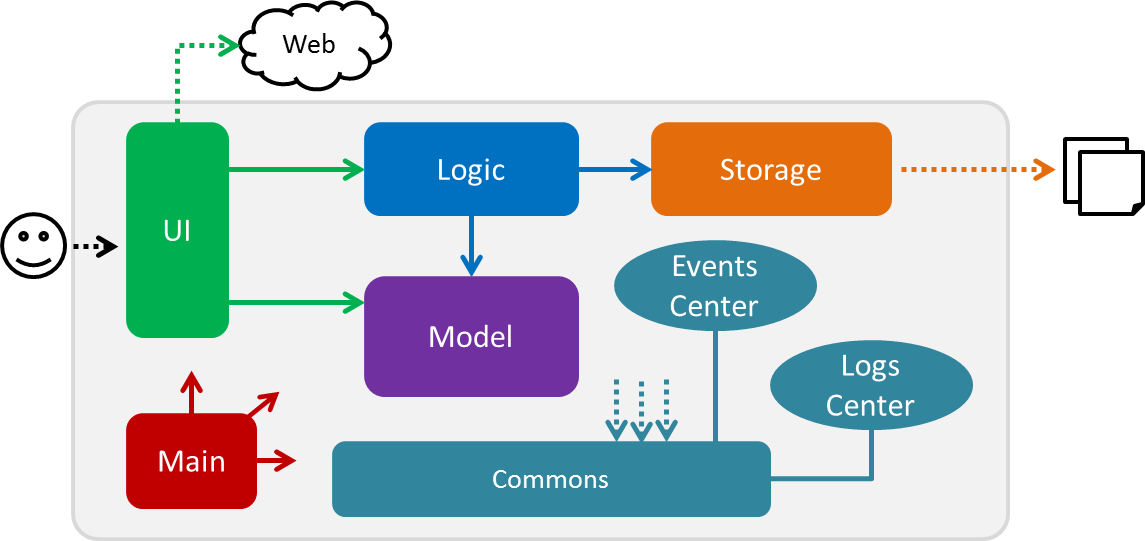
The Architecture Diagram given above explains the high-level design of the App. Given below is a quick overview of each component.
The .pptx files used to create diagrams in this document can be found in the diagrams folder. To update a diagram, modify the diagram in the pptx file, select the objects of the diagram, and choose Save as picture.
|
Main has only one class called MainApp. It is responsible for,
-
At app launch: Initializes the components in the correct sequence, and connects them up with each other.
-
At shut down: Shuts down the components and invokes cleanup method where necessary.
Commons represents a collection of classes used by multiple other components. Two of those classes play important roles at the architecture level.
-
EventsCenter: This class (written using Google’s Event Bus library) is used by components to communicate with other components using events (i.e. a form of Event Driven design) -
LogsCenter: Used by many classes to write log messages to the App’s log file.
The rest of the App consists of four components.
Each of the four components
-
Defines its API in an
interfacewith the same name as the Component. -
Exposes its functionality using a
{Component Name}Managerclass.
For example, the Logic component (see the class diagram given below) defines it’s API in the Logic.java interface and exposes its functionality using the LogicManager.java class.
Events-Driven nature of the design
The Sequence Diagram below shows how the components interact for the scenario where the user issues the command delete 1.
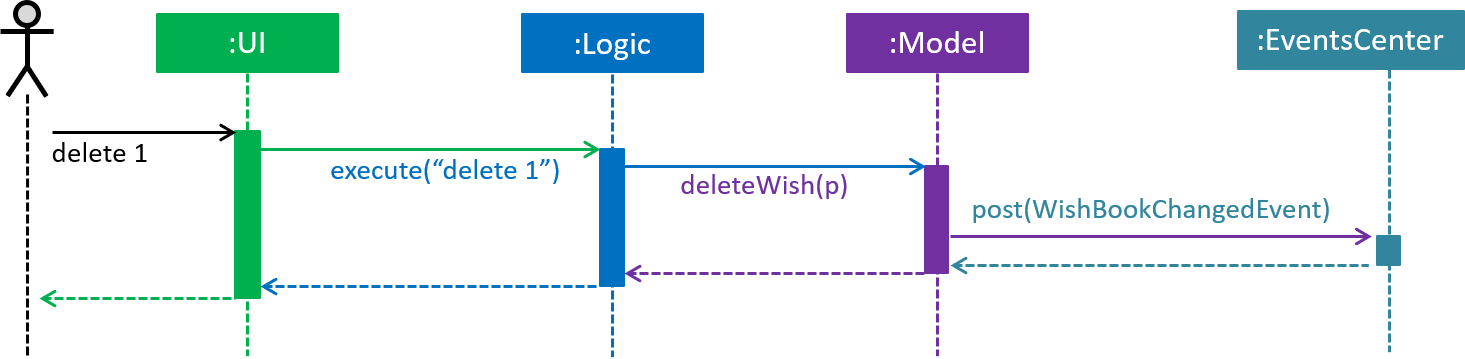
delete 1 command (part 1)
Note how the Model simply raises a WishBookChangedEvent when the Wish Book data is changed, instead of asking the Storage to save the updates to the hard disk. This event also triggers the save of wish histories to disk.
|
The diagram below shows how the EventsCenter reacts to that event, which eventually results in the updates being saved to the hard disk and the status bar of the UI being updated to reflect the 'Last Updated' time.
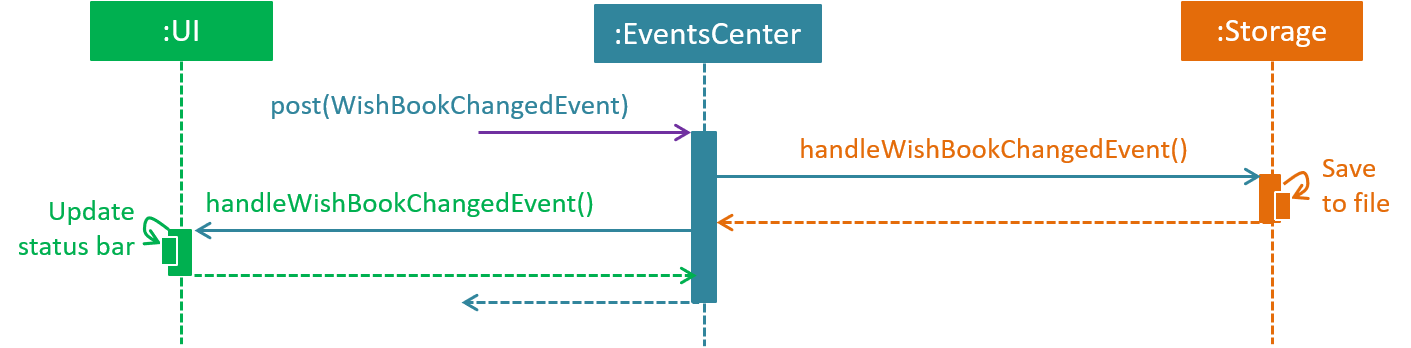
delete 1 command (part 2)
Note how the event is propagated through the EventsCenter to the Storage and UI without Model having to be coupled to either of them. This is an example of how this Event Driven approach helps us reduce direct coupling between components.
|
The sections below give more details of each component.
2.2. UI component
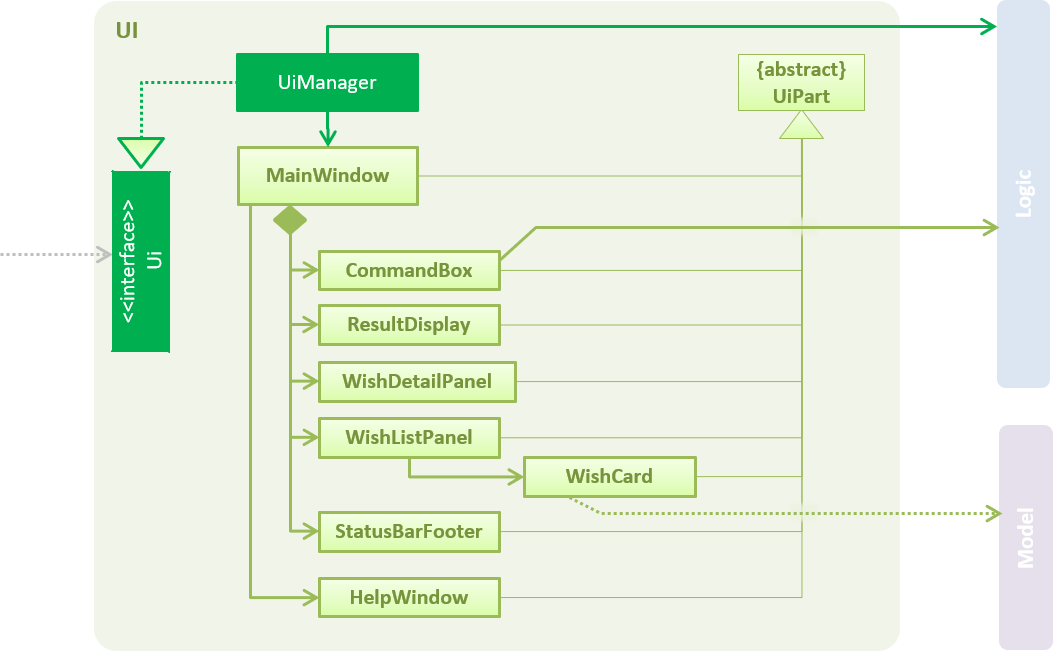
API : Ui.java
The UI consists of a MainWindow that is made up of parts e.g.CommandBox, ResultDisplay, WishListPanel, StatusBarFooter, BrowserPanel etc. All these, including the MainWindow, inherit from the abstract UiPart class.
The UI component uses JavaFx UI framework. The layout of these UI parts are defined in matching .fxml files that are in the src/main/resources/view folder. For example, the layout of the MainWindow is specified in MainWindow.fxml
The UI component,
-
Executes user commands using the
Logiccomponent. -
Binds itself to some data in the
Modelso that the UI can auto-update when data in theModelchange. -
Responds to events raised from various parts of the App and updates the UI accordingly.
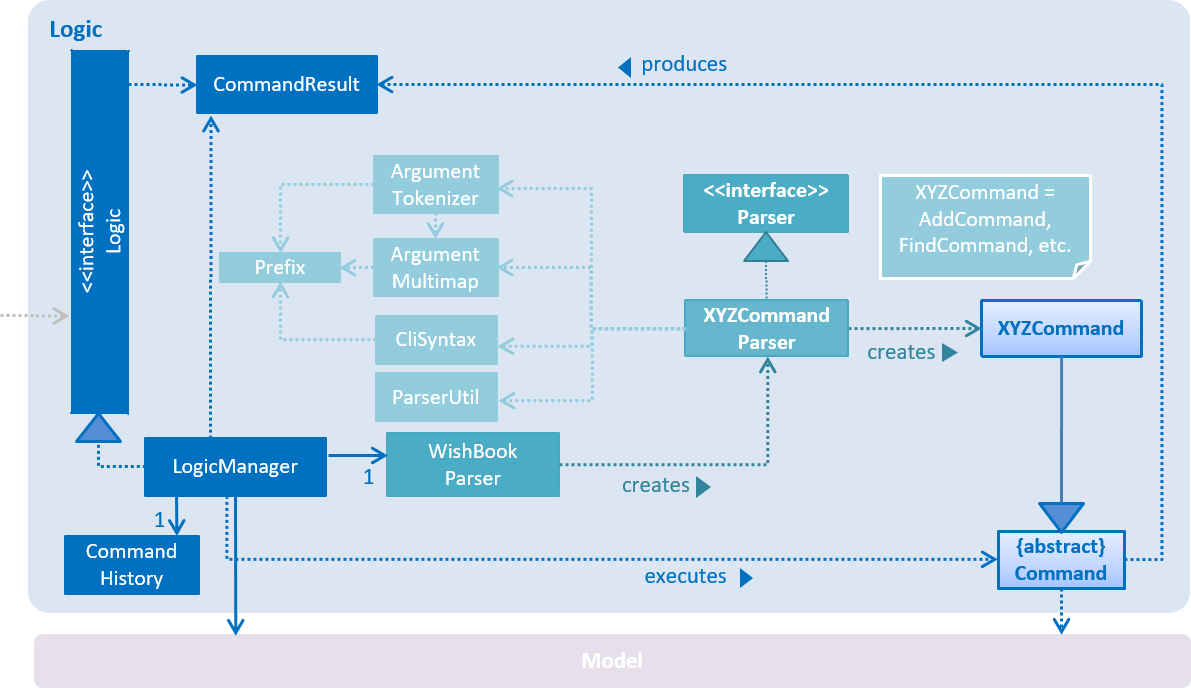
2.3. Logic component
API :
Logic.java
-
Logicuses theWishBookParserclass to parse the user command. -
This results in a
Commandobject which is executed by theLogicManager. -
The command execution can affect the
Model(e.g. adding a wish) and/or raise events. -
The result of the command execution is encapsulated as a
CommandResultobject which is passed back to theUi.
Given below is the Sequence Diagram for interactions within the Logic component for the execute("delete 1") API call.
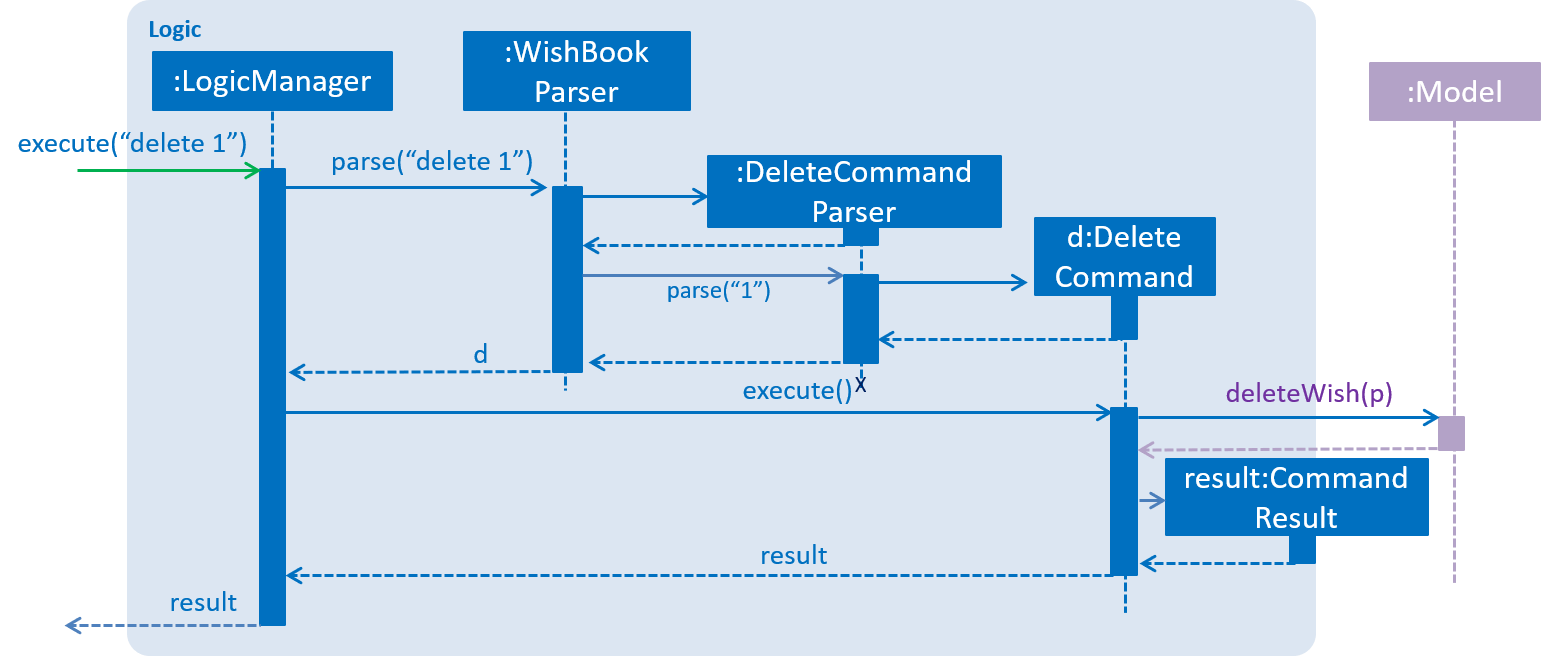
delete 1 Command2.4. Model component
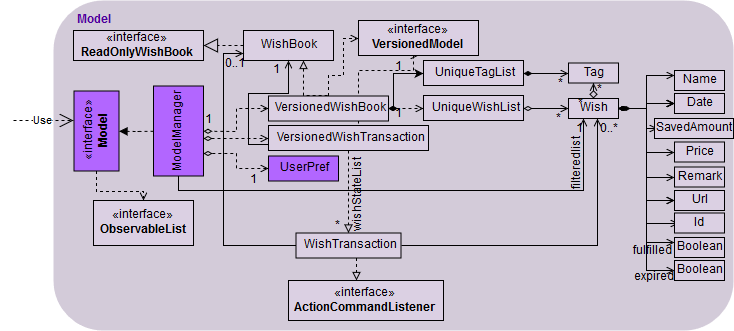
API : Model.java
The Model,
-
stores a
UserPrefobject that represents the user’s preferences. -
stores the Wish Book data.
-
stores the data of wish histories.
-
exposes an unmodifiable
ObservableList<Wish>that can be 'observed' e.g. the UI can be bound to this list so that the UI automatically updates when the data in the list change. The elements of theObservableList<Wish>can also be filtered and sorted to suit the needs of specific commands. -
does not depend on any of the other three components.
As a more OOP model, we can store a Tag list in Wish Book, which Wish can reference. This would allow Wish Book to only require one Tag object per unique Tag, instead of each Wish needing their own Tag object. An example of how such a model may look like is given below.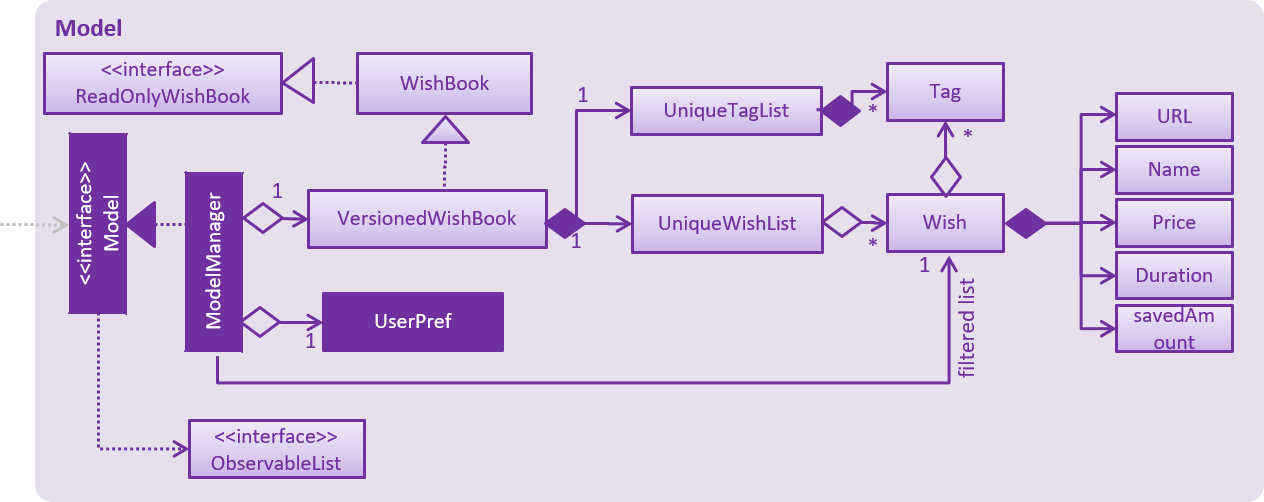
|
2.5. Storage component

API : Storage.java
The Storage component,
-
can save
UserPrefobjects in json format and read it back. -
can save the Wish Book data in xml format and read it back.
2.6. Common classes
Classes used by multiple components are in the seedu.WishBook.commons package.
3. Implementation
This section describes some noteworthy details on how certain features are implemented.
3.1. Model
3.1.1. Wish Model
A wish is uniquely identified by its Universal Unique Identifier (UUID) which is generated randomly only once for a
particular wish, upon its creation through the AddCommand. A wish stores the following primary attributes:
-
Name
-
Price
-
Date
-
Saved Amount
-
Url
-
Remark
-
Tags
-
UUID
| It is impossible for the user to create a duplicate wish as it is impossible to modify a wish’s UUID. |
3.1.2. Wish Priority
A wish needs to be prioritised in a specific order such that the wishes with the highest priority will be visible
on the top of the list. In WishBook, the priority is determined primarily by the due date of the wish which is
stored in every wish’s Date attribute. Ties are broken by Name. Further ties are broken by UUID as it is possible
for the Date and Name of two wishes to be identical.
The sorting of the displayed results is done by the filteredSortedWishes list. The sorting order is specified by
WishComparator.
3.1.3. Design Considerations
Aspect: Uniqueness of a Wish
-
Alternative 1(current choice): Identify a
Wishby a randomly generated UUID.-
Pros: Extremely low probability of collision.
-
Pros: No extra maintenance required upon generation as every
Wishis unique. -
Cons: UUID does not map to any real world entity and it is used strictly for identification.
-
Cons: It is more difficult to system test the
AddCommandwith the current group of methods for system tests as UUID is randomly generated each time.
-
-
Alternative 2: Identify a wish by
Name,Price,Date,Url,Tags. Wishes with identical values for these attributes will be represented by a singleWishCard. TheWishCardwill be augmented with aMultiplicityto indicate the number of identical wishes.-
Pros: WishBook will be more compact and every attribute stored in a
Wishmaps to a real entity. -
Cons: Additional attribute
Multiplicitymay have to be frequently edited as it is another attribute that is affected by multiple commands.
-
-
Alternative 3: Identify a wish by a new attribute
CreatedTime, which is derived from the system time when the wish is created.-
Pros: The attribute maps to a real entity. It can be an additional information presented to the user about a wish.
-
Cons: There might be collisions in
CreatedTimeif the the system time is incorrect.
-
3.2. Undo/Redo feature
3.2.1. Current Implementation
The undo/redo mechanism is facilitated by VersionedWishBook.
It extends WishBook with an undo/redo history, stored internally as an WishBookStateList and currentStatePointer.
Additionally, it implements the following operations:
-
VersionedWishBook#commit()— Saves the current wish book state in its history. -
VersionedWishBook#undo()— Restores the previous wish book state from its history. -
VersionedWishBook#redo()— Restores a previously undone wish book state from its history.
These operations are exposed in the Model interface as Model#commitWishBook(), Model#undoWishBook() and Model#redoWishBook() respectively.
Given below is an example usage scenario and how the undo/redo mechanism behaves at each step.
Step 1. The user launches the application for the first time. The VersionedWishBook will be initialized with the initial wish book state, and the currentStatePointer pointing to that single url book state.

Step 2. The user executes delete 5 command to delete the 5th wish in the wish book. The delete command calls Model#commitWishBook(), causing the modified state of the url book after the delete 5 command executes to be saved in the WishBookStateList, and the currentStatePointer is shifted to the newly inserted url book state.

Step 3. The user executes add n/David … to add a new wish. The add command also calls Model#commitWishBook(), causing another modified wish book state to be saved into the WishBookStateList.

If a command fails its execution, it will not call Model#commitWishBook(), so the wish book state will not be saved into the WishBookStateList.
|
Step 4. The user now decides that adding the wish was a mistake, and decides to undo that action by executing the undo command. The undo command will call Model#undoWishBook(), which will shift the currentStatePointer once to the left, pointing it to the previous wish book state, and restores the url book to that state.
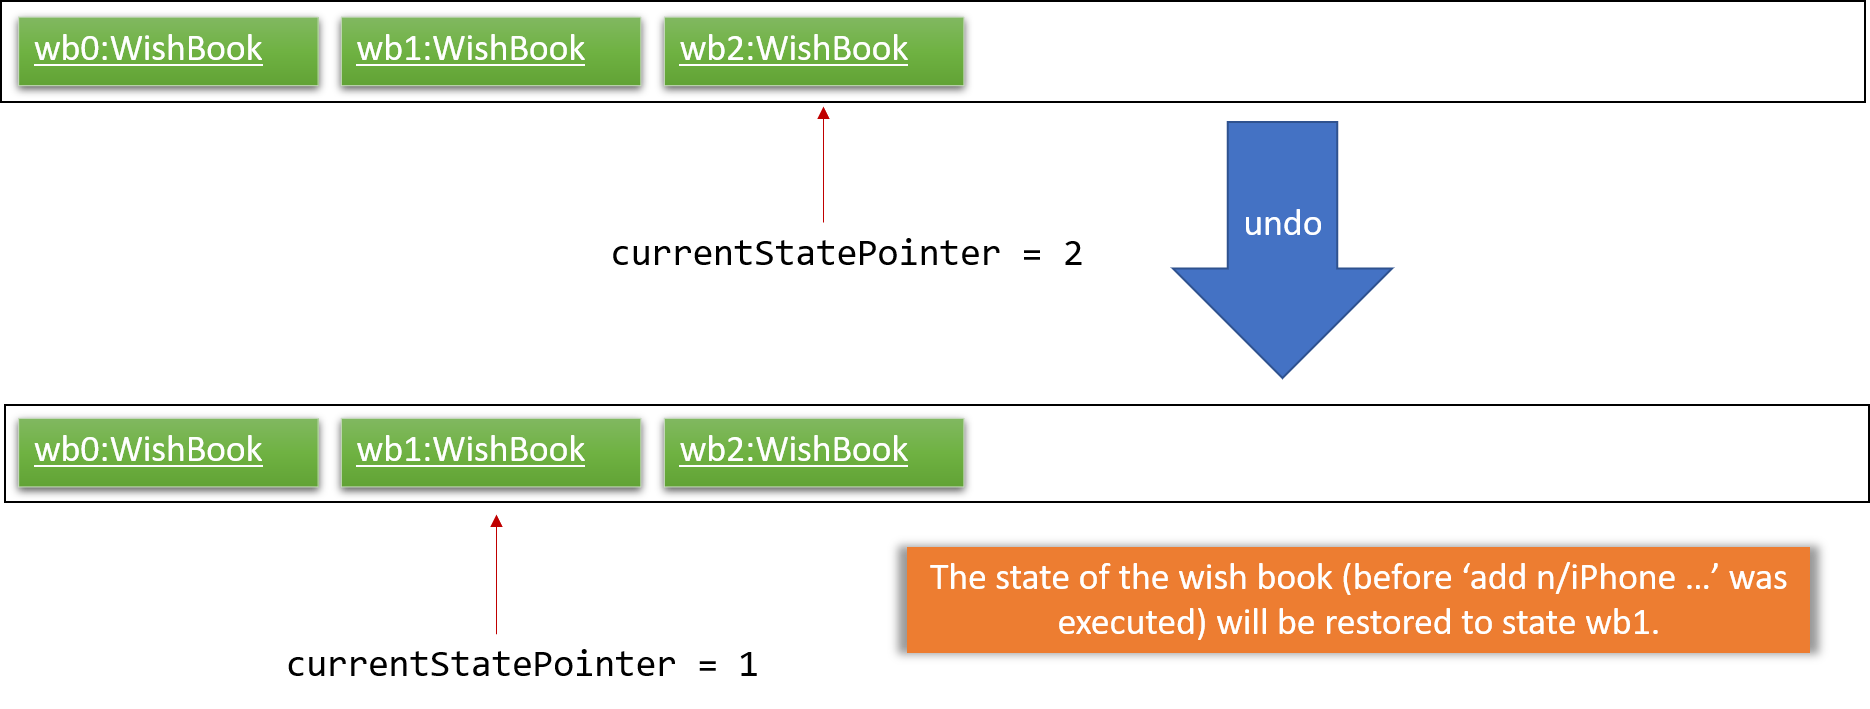
If the currentStatePointer is at index 0, pointing to the initial wish book state, then there are no previous url book states to restore. The undo command uses Model#canUndoWishBook() to check if this is the case. If so, it will return an error to the user rather than attempting to perform the undo.
|
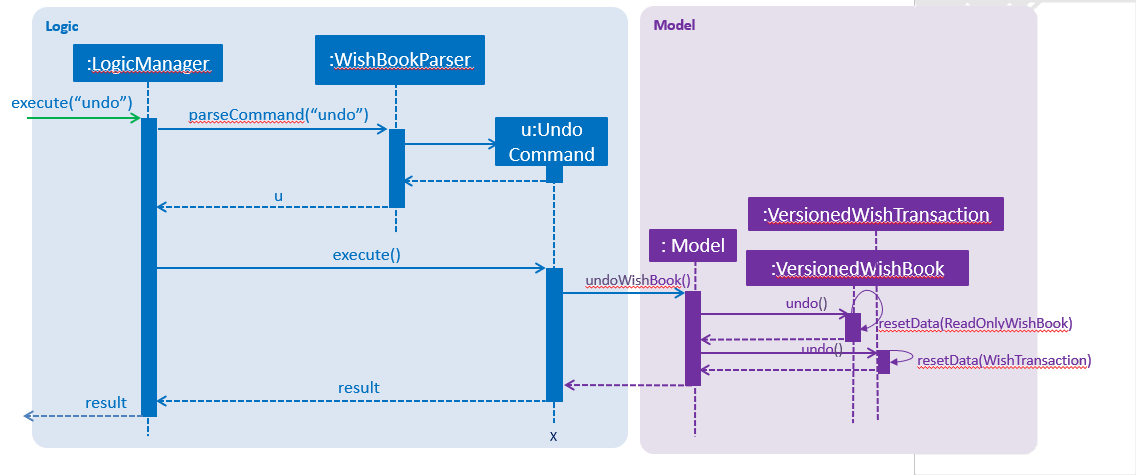
The following sequence diagram shows how the undo operation works:
The redo command does the opposite — it calls Model#redoWishBook(), which shifts the currentStatePointer once to the right, pointing to the previously undone state, and restores the wish book to that state.
If the currentStatePointer is at index WishBookStateList.size() - 1, pointing to the latest wish book state, then there are no undone url book states to restore. The redo command uses Model#canRedoWishBook() to check if this is the case. If so, it will return an error to the user rather than attempting to perform the redo.
|
Step 5. The user then decides to execute the command list. Commands that do not modify the wish book, such as list, will usually not call Model#commitWishBook(), Model#undoWishBook() or Model#redoWishBook(). Thus, the WishBookStateList remains unchanged.

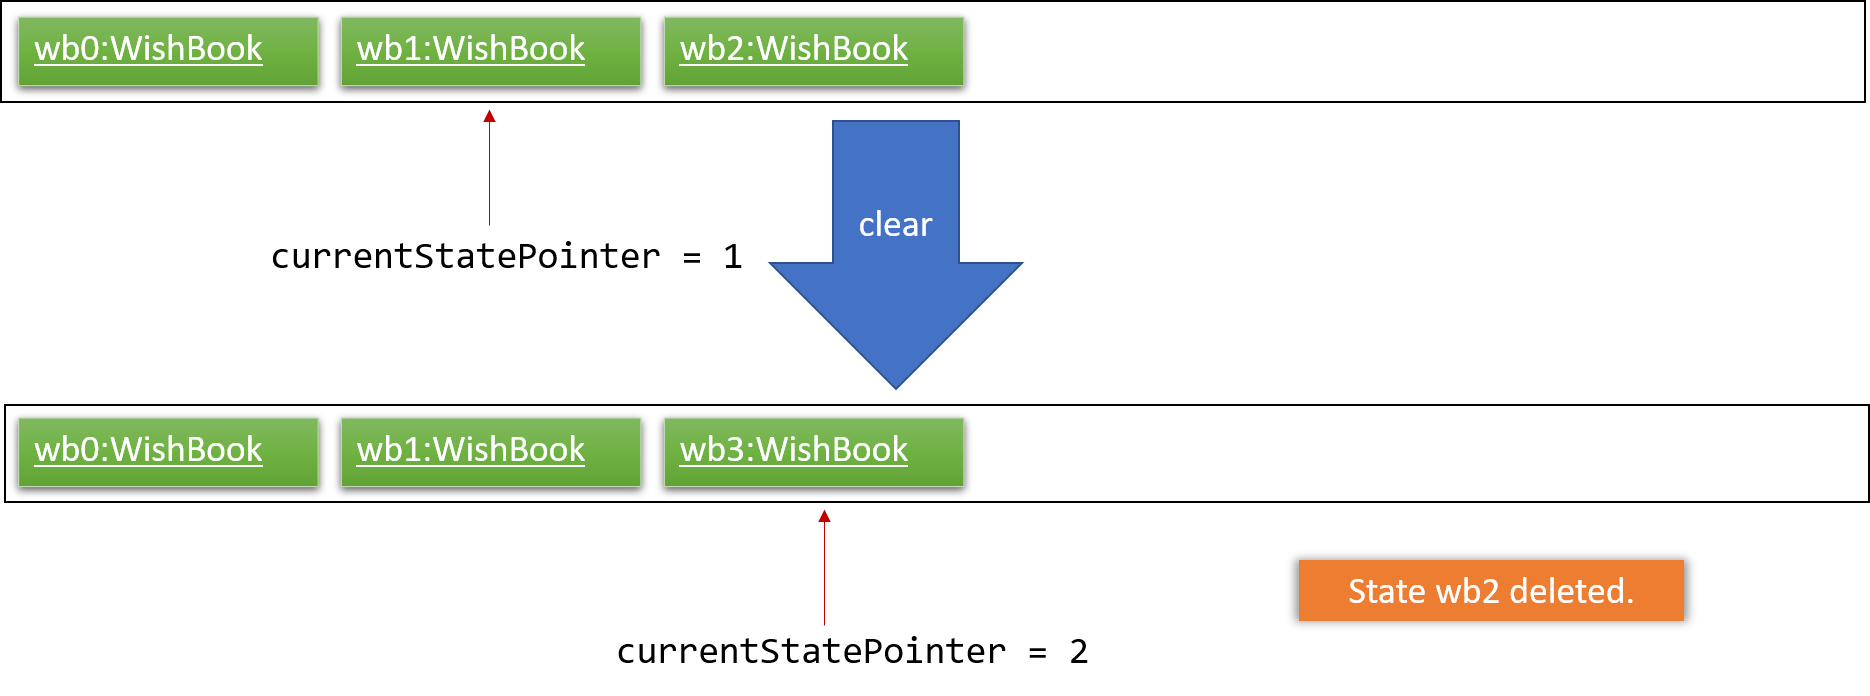
Step 6. The user executes clear, which calls Model#commitWishBook(). Since the currentStatePointer is not pointing at the end of the WishBookStateList, all wish book states after the currentStatePointer will be purged. We designed it this way because it no longer makes sense to redo the add n/David … command. This is the behavior that most modern desktop applications follow.
The following activity diagram summarizes what happens when a user executes a new command:

3.2.2. Design Considerations
Aspect: How undo & redo executes
-
Alternative 1 (current choice): Saves the entire wish book.
-
Pros: Easy to implement.
-
Cons: May have performance issues in terms of memory usage.
-
-
Alternative 2: Individual command knows how to undo/redo by itself.
-
Pros: Will use less memory (e.g. for
delete, just save the wish being deleted). -
Cons: We must ensure that the implementation of each individual command are correct.
-
Aspect: Data structure to support the undo/redo commands
-
Alternative 1 (current choice): Use a list to store the history of wish book states.
-
Pros: Easy for new Computer Science student undergraduates to understand, who are likely to be the new incoming developers of our project.
-
Cons: Logic is duplicated twice. For example, when a new command is executed, we must remember to update both
HistoryManagerandVersionedWishBook.
-
-
Alternative 2: Use
HistoryManagerfor undo/redo-
Pros: We do not need to maintain a separate list, and just reuse what is already in the codebase.
-
Cons: Requires dealing with commands that have already been undone: We must remember to skip these commands. Violates Single Responsibility Principle and Separation of Concerns as
HistoryManagernow needs to do two different things.
-
3.3. Savings History feature
3.3.1. Capturing the state of WishTransaction
The current state of the savings history of the WishBook is captured by VersionedWishTransaction.
VersionedWishTransaction extends WishTransaction and has an undo/redo history, similar to the implementation of the Undo/Redo feature, and is stored internally as a wishStateList and currentStatePointer. Additionally, it implements VersionedModel and so contains the implementation of the following operations:
-
VersionedWishTransaction#commit()— Saves the current wish transaction state in its history. -
VersionedWishTransaction#undo()— Restores the previous wish transaction state from its history. -
VersionedWishTransaction#redo()— Restores a previously undone wish transaction state from its history.
These operations are exposed in the Model interface as Model#commitWishBook(), Model#undoWishBook() and Model#redoWishBook() respectively.
3.3.2. Capturing the state of each Wish
WishTransaction keeps track of the state of all wishes in WishBook via a wishMap which maps the unique ID of a Wish to a list of Wish states. WishTransaction implements ActionCommandListener such that any state changing command performed to a Wish or the WishBook such as AddCommand(), EditCommand(), SaveCommand(), etc will result in the WishMap being updated accordingly in WishTransaction.
3.3.3. Persistent storage
VersionedWishTransaction, WishTransaction can be easily converted to and from xml using XmlWishTransactions. XmlWishTransactions is saved as an xml file when the user explicitly closes the window, thereby invoking MainApp#stop() which saves the current state of VersionedWishTransaction in the wishStateList to hard disk.
If the user’s command triggers a change in the state of the WishBook, a WishBookChangedEvent will be raised, causing the subscribed StorageManager to respond by saving both the current state of the WishBook and WishTransaction to disk.
Given below is an example usage scenario and how the savings history mechanism behaves at each step.
Step 1. The user launches the application. The default file path storing the previous state of the WishTransaction will be retrieved, unless otherwise specified by the user, and the contents from the xml file will be parsed and converted into a WishTransaction object via the XmlWishTransactions object. If the file at the specified location is behind the current state of the WishBook, content of the WishTransaction will be overwritten by the WishBook.
The wishStateList starts off with the initial state of the WishTransaction as the first item in the list.
|
Step 2. The user executes add n/iPhone … to add a new wish. The add command calls Model#commitWishBook(), causing the current state of the modified wish transaction state to be saved into wishStateList. As this is a command that changes the state of the WishBook, Model#addWish() will call VersionedWishTransaction#addWish() to add a new wish to the WishMap.
-
If a command fails its execution, it will not call
Model#commitWishBook(), so the wish transaction state will not be saved into thewishStateList. -
If the
WishMapcontains an identical wish (such is identified byWish#isSameWish()), then the call to add this wish will fail. As such, the wish will not be added to theWishMapor theWishBook.
Step 3. The user now decides that adding the wish was a mistake, and decides to undo that action by executing the undo command. The undo command will call Model#undoWishBook(), which will shift the currentStatePointer once to the left, pointing it to the previous wish transaction state, and restores the wish transaction to that state.
If the currentStatePointer is at index 0, pointing to the initial wish transaction state, then there are no previous wish transaction states to restore. The undo command uses Model#canUndoWishBook() to check if this is the case. If so, it will return an error to the user rather than attempting to perform the undo.
|
The redo command does the opposite — it calls Model#redoWishBook(), which shifts the currentStatePointer once to the right, pointing to the previously undone state, and restores the wish transaction to that state.
If the currentStatePointer is at index wishStateList.size() - 1, pointing to the latest wish transaction state, then there are no undone wish transaction states to restore. The redo command uses Model#canRedoWishBook() to check if this is the case. If so, it will return an error to the user rather than attempting to perform the redo.
|
Step 4. The user then decides to execute the command list. Commands that do not modify the state of the WishBook, such as list, will usually not call Model#commitWishBook(), Model#undoWishBook() or Model#redoWishBook(). Thus, the WishBookStateList remains unchanged.
Step 5. The user finally exits the app by clicking on the close button. The most recent state of the WishTransaction will be converted into xml format via the the XmlWishTransactions object and be saved into the same file path it was first retrieved from.
If there was some error saving the current state of the WishTransaction to the specified file path in hard disk, an exception will be thrown and a warning will be shown to the user. The current state of the WishTransaction object will not be saved to hard disk.
|
3.4. Add Wish feature
3.4.1. Current Implementation
The Add Wish feature is executed through an AddCommand by the user, which after parsing,
is facilitated mainly by the ModelManager which implements Model.
It also affects versionedWishBook and versionedWishTransaction by adding the
resultant wish to both of their respective data structures.
After adding a Wish, the filteredSortedWishes is also updated to reflect the
latest version of WishBook.
The UI is also prompted to refresh through a WishBookChangedEvent.
AddCommandParser parses the user’s input for parameters using prefixes,
and checks them against their respective regular expressions (regex), specified
in their respective classes.
The following prefix/parameter pairs are compulsory, where a user’s input will be rejected if they are not provided:
-
n/: Name -
p/: Price -
One of the following Date parameters:
-
d/: Exact expiry date -
a/: duration (or lifetime) from time when command is entered
-
The following prefix/parameter pairs are optional, where a user’s input will be successful even if they are not provided:
-
t/: tags (more than one allowed) -
u/: product’s URL (product page)
|
Regarding Duration (
|
Given below is an example usage scenario and how an AddCommand is carried out.
Step 1. The user types in a valid AddCommand, add n/1 TB Toshiba SSD p/158 a/200d, and the current date is 2nd October 2017 (2/10/2017).
The AddCommandParser will employ ParserUtil to parse the attributes specified after each prefix. The parsing of the
Duration attribute which follows a/ in the command will be discussed below.
Since Duration prefix is used, the computation of a wish’s expiry date is handled
internally in the ParserUtil class, which ParserUtil#parseDate() parses and converts
the input string into a Period object (if input is valid),
and adds the resultant Period to the current Date to get the desired
Date of the Wish.
The resultant Wish will have the following properties:
-
id:
a randomly-generated UUID -
Name: 1TB Toshiba SSD
-
SavedAmount: 0.00
-
Price: 158.00
-
Date: 20/4/2018 (20th April 2018)
-
URL:
empty string -
Remark:
empty string -
Tags:
none -
Fulfilled:
false -
Expired:
false
The resultant wish is pass into VersionedWishBook#addWish and VersionedWishTransaction#addWish,
which tracks the history of the WishBook and Wish respectively. The list of wishes shown on the UI is also updated to show all wishes again,
as filteredSortedWishes is updated to have all wishes in WishBook and a WishBookChangedEvent is fired.
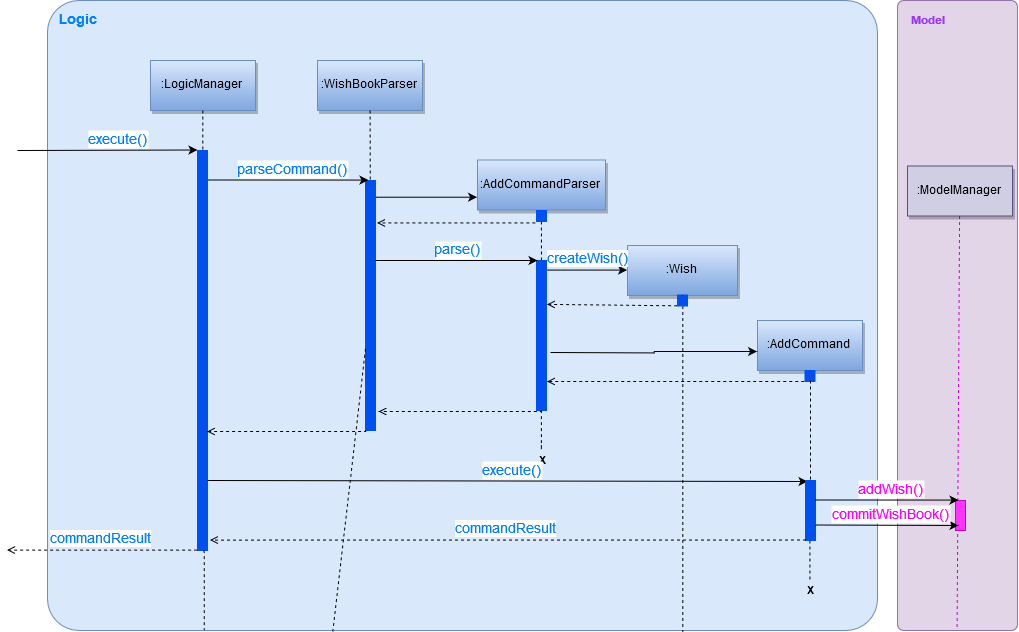
The following sequence diagram shows how an AddCommand is processed in WB:
Step 2. Some time later, the user decides that she wants the exact same wish,
but duplicated, and enters the exact same command, but with an exact Date
instead of Duration, so the command entered is
add n/1 TB Toshiba SSD p/158 d/20/4/2018.
Since Date prefix is used, the ParserUtil parses the string into a Date object,
and the resultant object is used directly for the resultant Wish.
Similar to in Step 1, the command will be parsed successfully and a second Wish
will be added, albeit with a different (hidden) id generated.
The resultant Wish will have the following properties:
-
id:
another randomly-generated UUID -
Name: 1TB Toshiba SSD
-
SavedAmount: 0.00
-
Price: 158.00
-
Date: 20/4/2018 (20th April 2018)
-
URL:
empty string -
Remark:
empty string -
Tags:
none -
Fulfilled:
false -
Expired:
false
3.4.2. Design Considerations
-
Alternative 1 (current choice): Different prefixes for
DurationandDate.-
Pros: More focused user experience. User get more specific feedback depending on their preferred way of inputting date if a wrong input was made. If user uses
a/and enters an incorrectDuration, the user will not receive an error message about the correct format for an exactDate, and will only be notified of the correct format of aDuration. -
Pros: Easier to implement and handle isolate errors related to respective input parameters.
-
Cons: More prefixes for user to remember.
-
-
Alternative 2: Have
DurationandDateuse the same prefix.-
Pros: More natural usage of one prefix to determine
Wish's desired expiry date. -
Cons: Conflating implementation of
DurationandDate, hence harder to debug. -
Cons: Tricky to implement, as we are parsing one input for two different desired formats.
-
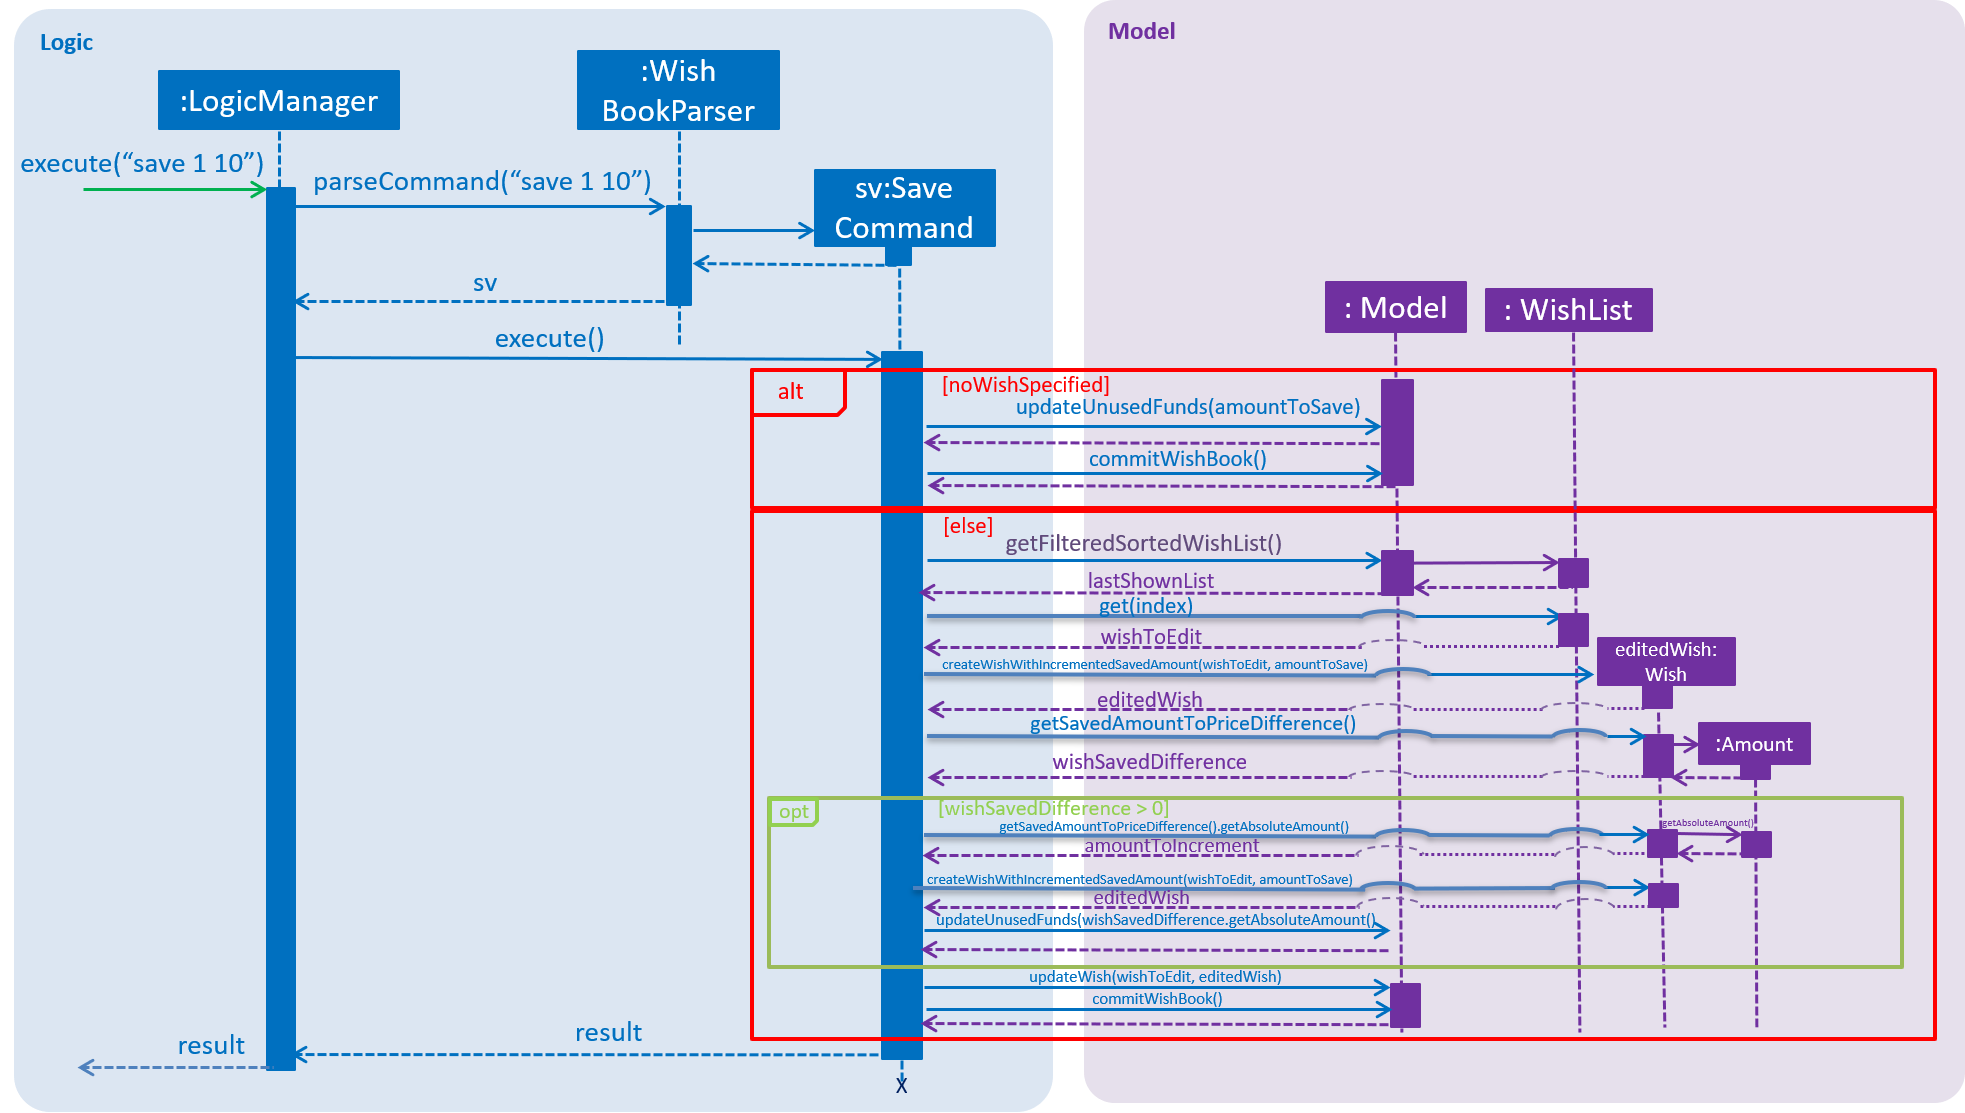
3.5. Save Amount feature
3.5.1. Current Implementation
The Save Amount feature is executed through a SaveCommand by the user, which after parsing,
is facilitated mainly by the ModelManager which implements Model.
Wish stores the price and savedAmount of Wish, helping to track the progress of the savings towards the price.
Meanwhile, WishBook stores an unusedFunds, which is an unallocated pool of funds that can be used in the future.
After adding a saving, the filteredSortedWishes in ModelManager is updated to reflect the latest observable WishBook.
Given below is an example usage scenario and how the SaveCommand behaves at each step:
Step 1. The user executes save 1 10, to save $10 into an existing wish with Index 1 and Price $15. The $10 is
wrapped in an Amount and a SaveCommand instance is created with the Amount. Amount is then used to make an updated
instance of the Wish at index 1 whose SavedAmount will be updated. Model#updateWish is then called to update this
wish with the old one in WishBook.
The Index of each Wish is labelled at the side of the app.
|
The resultant wish will have the following properties:
-
Name: 1TB Toshiba SSD
-
SavedAmount: 10.00
-
Price: 15.00
-
Date: 20/4/2018 (20th April 2018)
-
URL:
empty string -
Remark:
empty string -
Tags:
none -
Fulfilled:
false -
Expired:
false
Amount to be saved can be a negative value where it would mean a withdrawal of money from a particular wish.
|
SavedAmount of a wish cannot be negative. This means that an Amount cannot be negative enough to cause SavedAmount
to be negative.
|
Step 2. The user decides to execute save 1 10 again. However, SaveCommand checks that savedAmount > price.
SaveCommand#execute creates a new updated Wish with savedAmount = wish.getPrice().
The resultant wish will have the following properties:
-
Name: 1TB Toshiba SSD
-
SavedAmount: 15.00
-
Price: 15.00
-
Date: 20/4/2018 (20th April 2018)
-
URL:
empty string -
Remark:
empty string -
Tags:
none -
Fulfilled:
true -
Expired:
false
Step 3. The excess amount of $5 is stored in a new Amount variable excess.
SaveCommand#execute then calls Model#updateUnusedFunds(excess) to update the unusedFunds in WishBook.
In WishBook, the result would be:
-
unusedFunds: 5.00
Step 4. The user tries to execute save 1 10 again. However, since the value for Wish#isFulfilled is true, the amount
will not be saved. SaveCommand#execute will throw a CommandException, with the message "Wish has already been fulfilled!".
The following sequence diagram shows how the save operation works:
3.5.2. Design Considerations
Aspect: Data structure to support the unusedFunds feature
-
Alternative 1 (current choice): Store it in a
SavedAmountvariable inWishBook.-
Pros: Easy to implement.
-
Cons: More methods needed when needing to move funds from
unusedFundsto other wishes.
-
-
Alternative 2: Store it as a pseudo wish with index 0.
-
Pros: It can be treated as another
wish, hence existing methods can be used without needing to create much more new ones. -
Cons: Requires dealing with an extra wish that has to be hidden on the
WishListPaneland displayed separately on the UI. We must remember to skip this wish in methods that involve displaying the WishList.
-
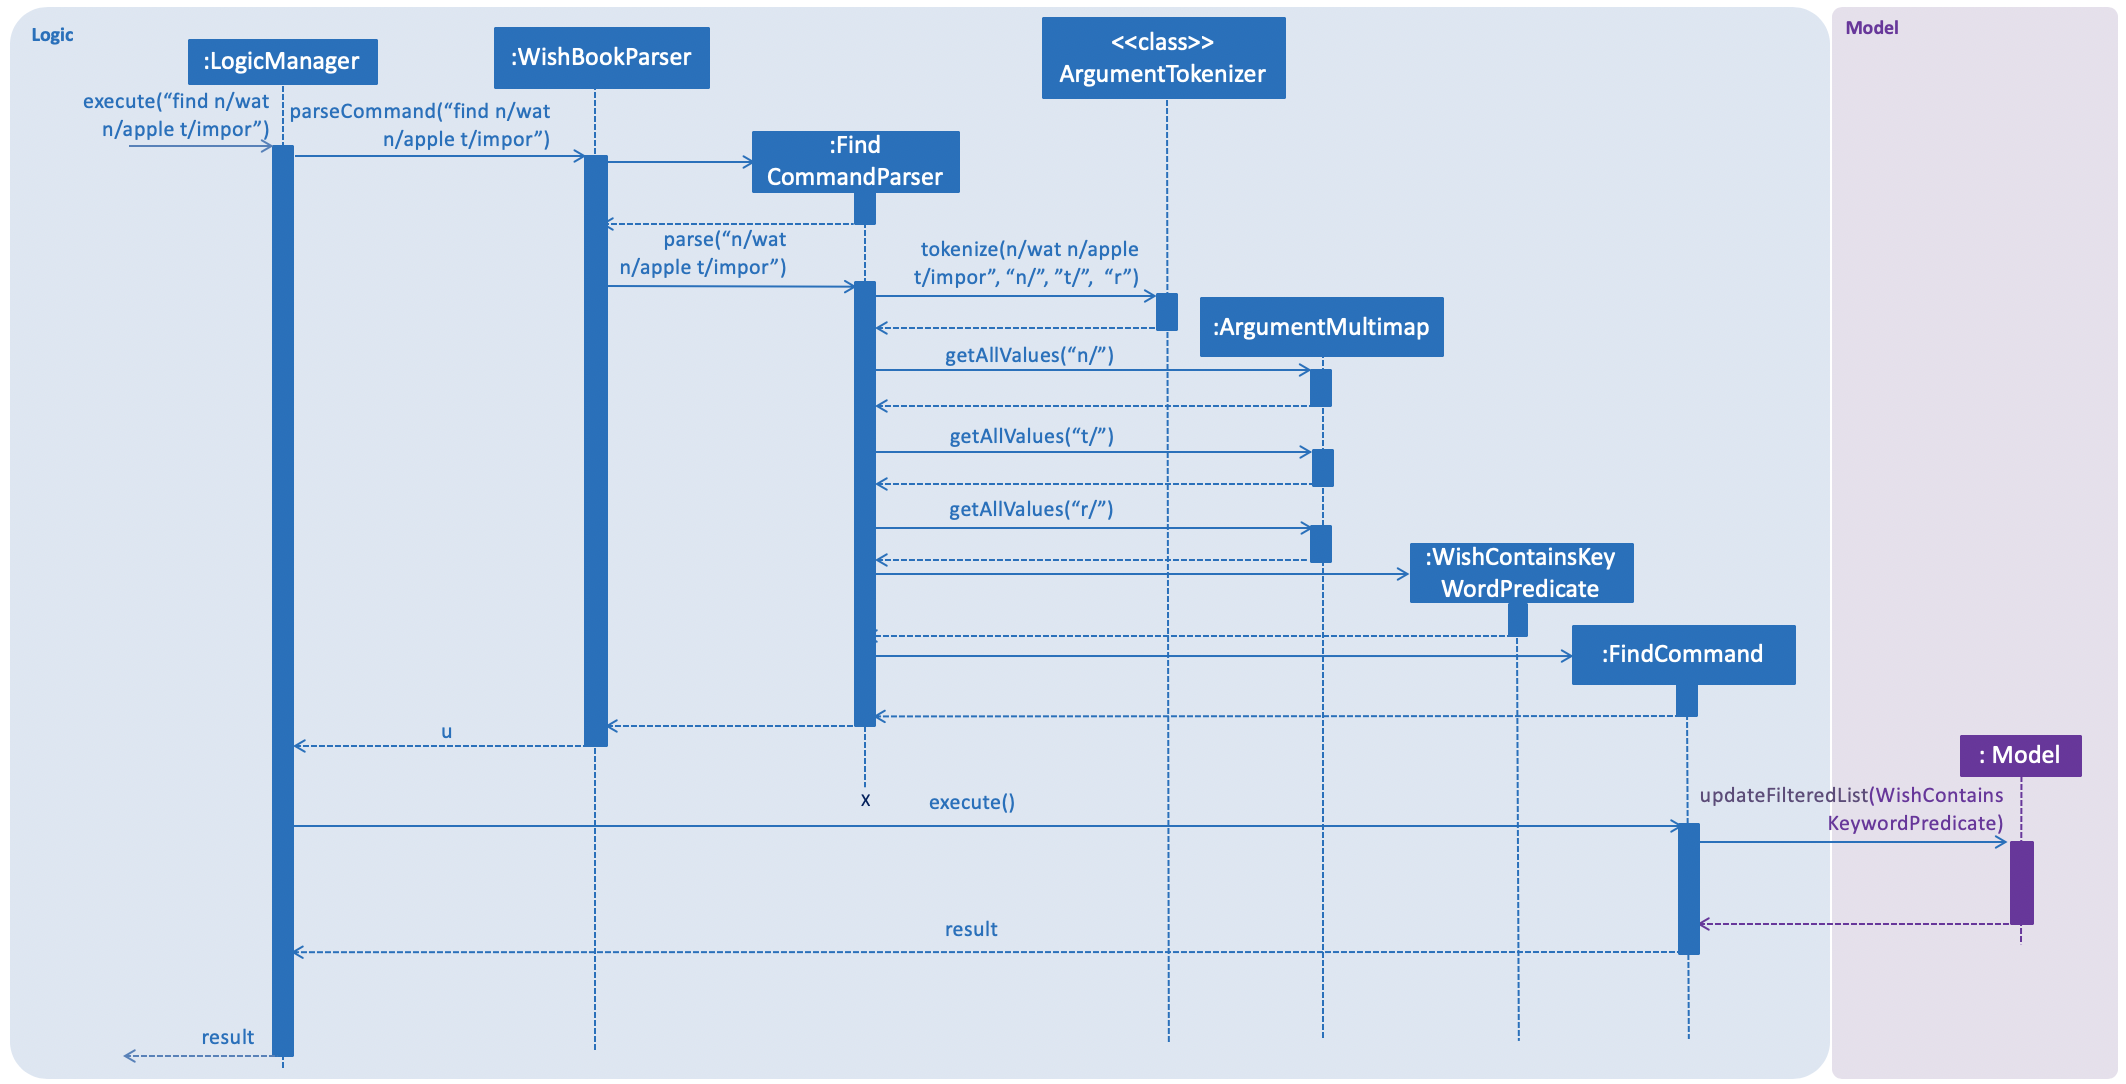
3.6. Find Wish Feature
3.6.1. Current Implementation
The find mechanism is supported by FindCommandParser. It implements Parser that implements the following operation:
-
FindCommandParser#parse()— Checks the arguments for empty strings and throws aParseExceptionif empty string is found. It then splits the arguments usingArgumentTokenizer#tokenize()and returns anArgumentMultimap. Keywords of the same prefix are then grouped usingArgumentMultimap#getAllValues().
The find mechanism is also facilitated by FindCommand. It extends Command and implements the
following operation:
-
FindCommand#execute()— Executes the command by updating the currentFilteredSortedWishListwith theWishContainsKeywordPredicate.
The predicate WishContainsKeywordsPredicate, takes in three lists of the keywords for the following attributes:
-
Name
-
Tags
-
Remark
and also the isExactMatch argument. The result of the predicate is determined by checking
whether a Wish contains the given keywords at their corresponding attributes. The match threshold
is dictated by the value of isExactMatch.
3.6.2. Example
Given below is an example usage scenario and how the Find mechanism behaves at each step.
Step 1. The user launches the application for the first time.
Step 2. The user executes find n/wat n/apple t/impor command to get all wishes whose name contains the
keywords 'iphone' or 'tablet'.
Step 3. The FindCommandParser#parse() is called and the WishContainsKeywordPredicate is constructed with
the arguments of the find command.
Step 4. FindCommand#execute() is then called.
Step 5. The entire list of wishes is filtered by the predicate WishContainsKeywordsPredicate.
Step 6. The filtered list of wishes is returned to the GUI.
3.6.3. Design Considerations
Aspect: Argument format
-
Alternative 1 (Current choice): Require the user to prepend every keyword argument with the appropriate Wish attribute prefix.
-
Pros: Easier to implement as it easier to match keyword against a Wish if the attribute to match against is known.
-
Pros: User has more control over the results returned.
-
Cons: User is required to type slightly more.
-
-
Alternative 2: No prefixes are required in the arguments. Keywords can match with any one of the following chosen wish attributes:
Name,TagsorRemark.-
Pros: Less typing required from user.
-
Cons: Command might be slightly slower as every keyword has to be checked against all chosen attributes of the wish.
-
Cons: User has less control over the results returned.
-
3.6.4. Aspect: Default threshold for match without the exact match flag
-
Alternative 1 (Current choice): Keywords appended to different prefixes are grouped with a logical AND and keywords appended to the same prefixes are grouped with a logical OR when being matched against a
Wish.-
Pros: A more intuitive way to find wishes.
-
Cons: Can be restrictive in some situations.
-
-
Alternative 2: Keywords appended to different prefixes are grouped with a logical OR and keywords appended to the same prefixes are grouped with a logical OR when being matched against a
Wish.-
Pros: Search results will be more inclusive.
-
Cons: Very slim chance for such a use case.
-
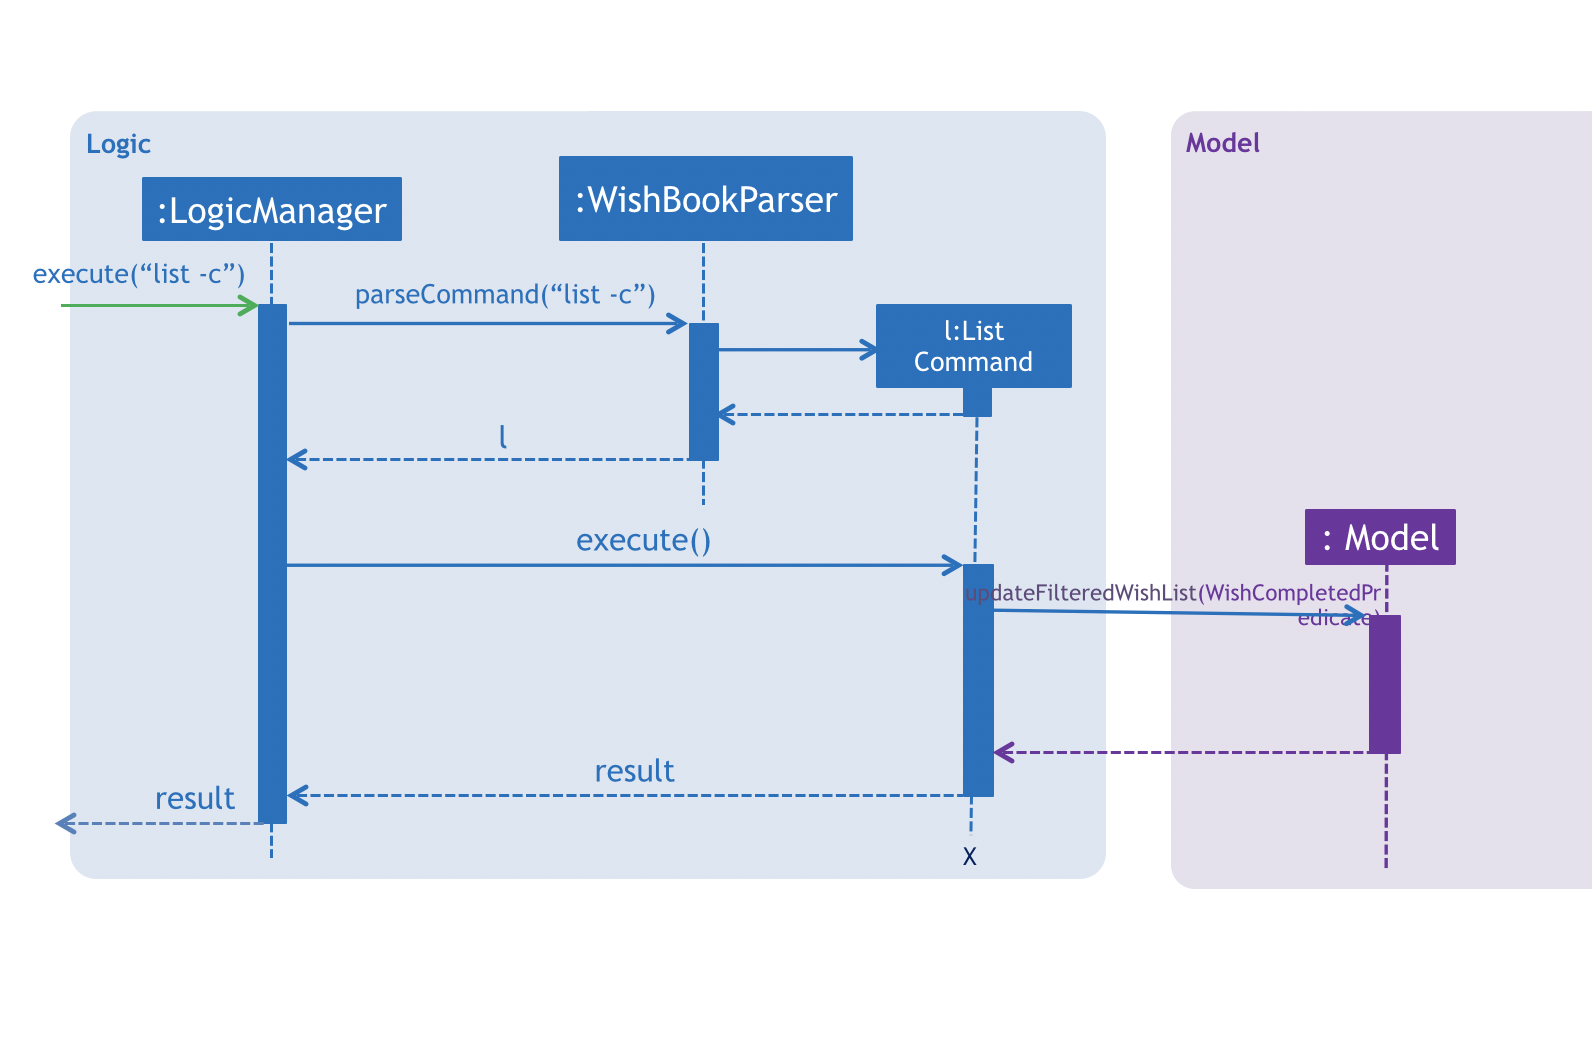
3.7. List feature
The list -c and list -u command allows the user to view the list of all wishes, completed and ongoing, respectively.
A wish is completed if the savedAmount is greater or equal to the price of the wish.
3.7.1. Current Implementation
Given below is an example usage scenario and how the list overdue mechanism behaves at each step:
-
The user executes the command
list -c. -
model.updateFilteredWishList()will update the wish list withWishCompletedPredicateas the parameter (boolean).wish.isFulfilled()is called to check whether the wish is completed or not. -
The updated wish list would be reflected on the UI to be displayed to the user.
The following sequence diagram shows how the Wish Detail Panel displays its updated content:
3.8. Redesign of User Interface
The UI has been redesigned to implement the following UI components required for WishBook:
-
Command Box
-
Wish List Panel
-
Wish Detail Panel
3.8.1. Wish List Panel
The Wish List Panel consists of a list of Wish Card which contains 4 UI elements:
-
WishCard#nameLabel- ATextelement that displays the wish’s name. -
WishCard#progressLabel- ATextelement that displays the wish’s saving progress in percentage format. -
WishCard#tags- AFlowPaneelement that contains aTextelement which displays the wish’s assigned tags. -
WishCard#progressBar- AprogressBarelement that visually presents the percentage of the wish’s current saving progress.
Whenever the user adds a new wish or edits an existing wish, a new WishCard containing the wish will be added to the Wish List Panel or the content in the existing WishCard will be updated respectively.
The user will be able to view the wish’s current saving progress both in terms of text on the progressLabel (e.g. ’80%’) and the progressBar. Also, the user will be able to see all the tags he/she assigned to categorize the wish.
Problem with the old design
The UI (MainWindow) constructs the WishListPanel by obtaining an ObservableList of wish cards from Model, this list is assigned when UI starts, and will never be re-assigned.
The UI "observes" the list and updates when it is modified.
This approach works well for the WishListPanel because WishBook contains only 1 list of wish cards.
However, the saving history list in the WishDetailPanel can not be updated in the same manner because Model component will change its card list’s reference when a user adds a new wish or updates the content of the wish.
In this case, the WishDetailPanel in UI will not be updated because the card list of which UI has reference to is actually not changed.
Design considerations
-
Alternative 1 (current choice): Have a wishList in
Modeland keep it updated with the current list of cards-
Explanation: The UI needs only 1 reference to this
wishList, each time user executes any changes,wishListis cleared and the new list of cards is copy to thewishList. -
Pros: The structure of
Modeland UI component needs not be changed -
Cons: Need to keep a copy of the current card list, copying the whole list of cards for each command operation has bad effect on performance .
-
-
Alternative 2: Model component raises an event when its current card list’s reference is changed
-
Explanation: When user adds a new wish or executes save,
Modelwill raise an event (WishPanelUpdatedEvent), which is subscribed by UI, then UI can re-assign its list of cards and update the cards panel accordingly. -
Pros: Better performance
-
Cons: Need to re-design
Modeland UI components
-
3.8.2. Wish Detail Panel
The Wish Detail Panel consists of 3 UI sub-components:
-
WishDetailSavingAmountthat containsTextelements to display price and the saving progress of the wish -
WishDetailSavingHistorythat contains aListof history of saving inputs of the wish -
WishBrowserPanelthat displaysWebViewof the URL of the wish.
Whenever the user adds a new wish or edits an existing wish, the content of the wish in Wish Detail Panel will be updated. The user will be able to view the wish’s current saving progress and the history of his/her saving inputs of the wish in the list format. Also, the user will be able to browse through the wish’s product page via its assigned URL.
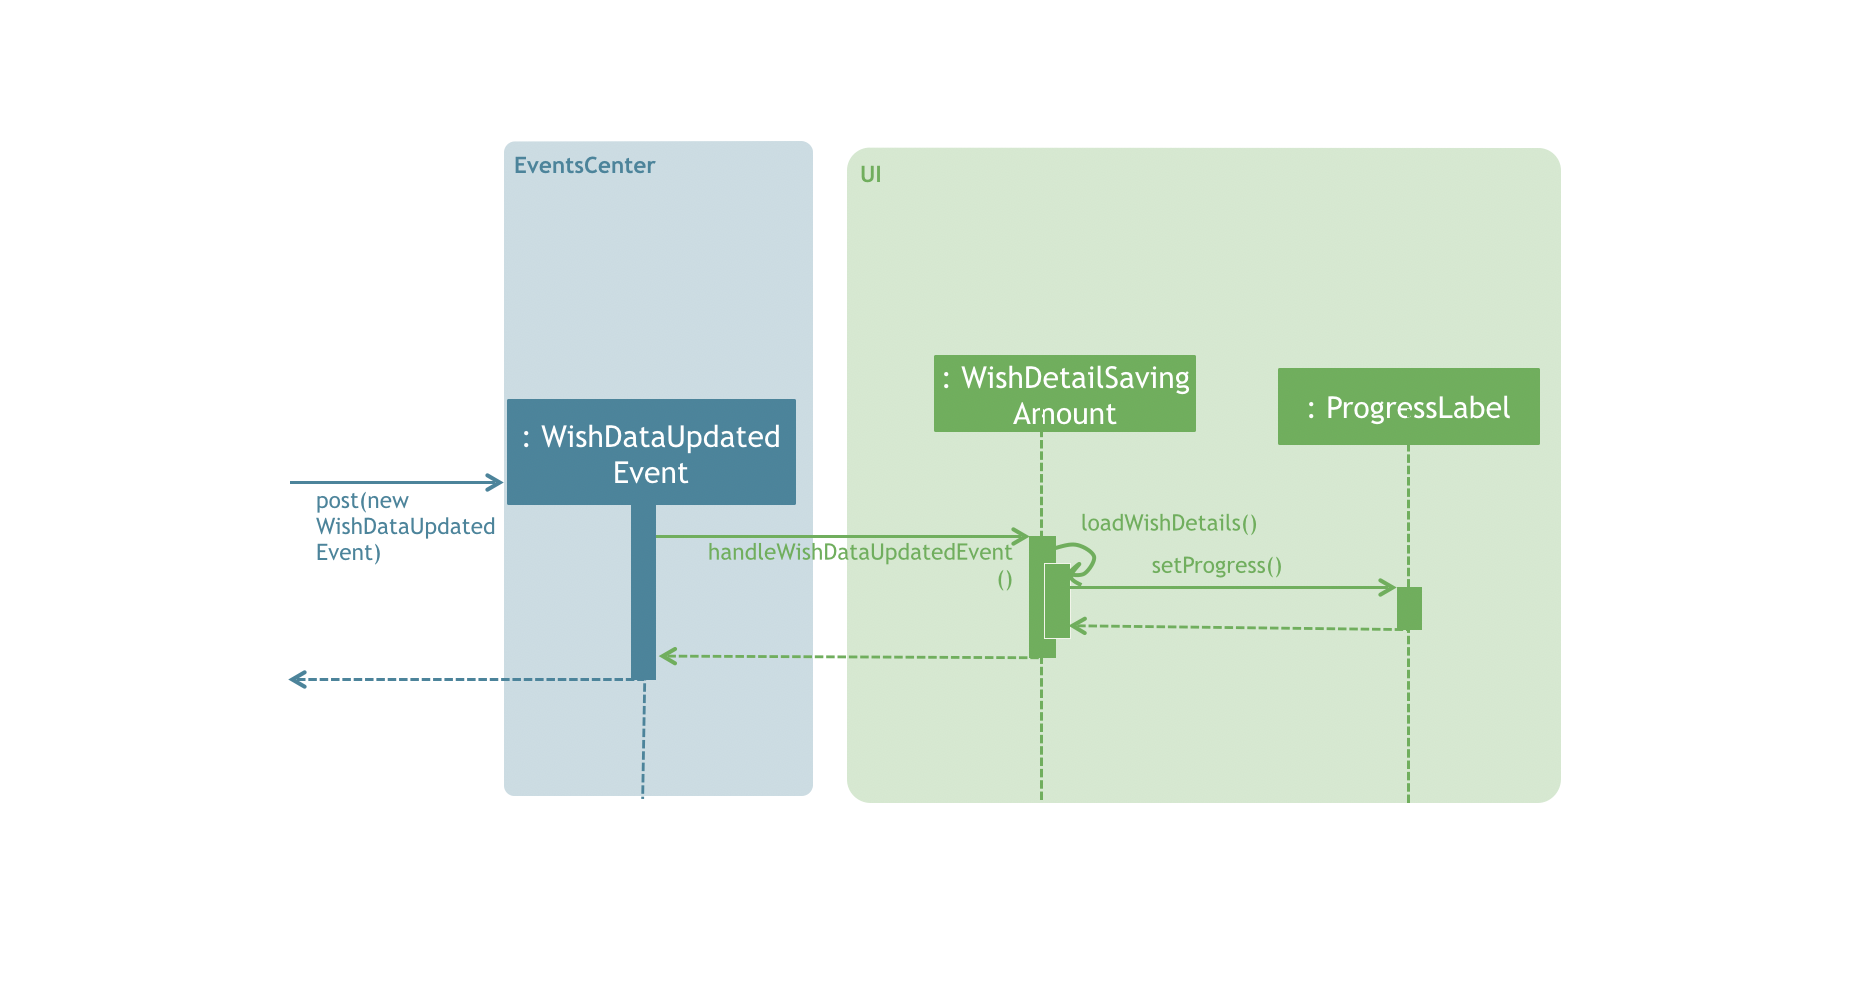
Current Implementation
Every time a new Wish is added or an existing wish is updated by the commands such as save, it raises a WishDataUpdatedEvent.
The UI will then handle that event and update the WishDetailPanel with the new version of wish.
Given below is an example usage scenario and how the WishBook behaves and WishDetailPanel is updated at each step:
-
The user executes the command
save 1 1000.
| If a command fails its execution, WishDataUpdatedEvent will not be posted. |
-
The save command updates the model with the new wish and raises a new
WishDataUpdatedEvent. -
WishDetailSavingAmountandWishDetailSavingHistoryresponds to theWishDataUpdatedEventwithWishListPanel#handleWishUpdatedEvent(). -
The
WishDetailSavingAmountupdates the wish’s current saving progress whenWishDetailSavingAmount#loadWishDetailsis called. -
The progress is calculated from when
Wish#getProgressis called. The value is saveAmount / price. Then the progress label for the wish is set to that fraction. -
The
WishDetailSavingHistoryupdates the wish’s saving history list whenWishDetailSavingHistory#loadWishDetailsis called. -
The saving history list is cleared.
-
The new set of history entry is retrieved from
wishTransaction#getWishMapand the saved amount is calculated from subtracting previous saving amount from the next one. -
The saving history list is now filled with the new list of updated saving history.
The following sequence diagram shows how the Wish Detail Panel displays its updated content:
Design Considerations
Aspect: How to update the progress and saving history on UI
-
Alternative 1 (current choice): Clear all the sub components and add new sub components accordingly
-
Pros: No matter which progress or history is changed, or what type of change (ie. delete, add, or edit), this change can be handled by the same method each time.
-
Cons: It is redundant to clear everything and replace them with new sub components.
-
-
Alternative 2: Handle different kinds of changes to the progress or history lists.
-
Pros: It is a lot faster to only change the sub component that is affected.
-
Cons: There are too many cases for how the lists can be changed. (ie. a different change is needed for each of these cases: wish is deleted/edited/created/cleared, or a
wishTransactionis deleted/added)
-
3.9. [Proposed] Savings Notifications
3.9.1. Justification
Some users may have many wishes, all of which have a different targeted date of completion and different price. It may thus be difficult for users to keep track of how much they need to consistently save to fulfil their various wishes on time. This Savings Notification feature will allow users to opt for daily/weekly/monthly notifications for each specific wish, reminding them of the amount that they need to save at the beginning of the chosen time period. This will help users to consistently save towards their wishes.
3.10. Logging
We are using java.util.logging package for logging. The LogsCenter class is used to manage the logging levels and logging destinations.
-
The logging level can be controlled using the
logLevelsetting in the configuration file (See Section 3.11, “Configuration”) -
The
Loggerfor a class can be obtained usingLogsCenter.getLogger(Class)which will log messages according to the specified logging level -
Currently log messages are output through:
Consoleand to a.logfile.
Logging Levels
-
SEVERE: Critical problem detected which may possibly cause the termination of the application -
WARNING: Can continue, but with caution -
INFO: Information showing the noteworthy actions by the App -
FINE: Details that is not usually noteworthy but may be useful in debugging e.g. print the actual list instead of just its size
3.11. Configuration
Certain properties of the application can be controlled (e.g App name, logging level) through the configuration file (default: config.json).
4. Documentation
We use asciidoc for writing documentation.
| We chose asciidoc over Markdown because asciidoc, although a bit more complex than Markdown, provides more flexibility in formatting. |
4.1. Editing Documentation
See UsingGradle.adoc to learn how to render .adoc files locally to preview the end result of your edits.
Alternatively, you can download the AsciiDoc plugin for IntelliJ, which allows you to preview the changes you have made to your .adoc files in real-time.
4.2. Publishing Documentation
See UsingTravis.adoc to learn how to deploy GitHub Pages using Travis.
4.3. Converting Documentation to PDF format
We use Google Chrome for converting documentation to PDF format, as Chrome’s PDF engine preserves hyperlinks used in webpages.
Here are the steps to convert the project documentation files to PDF format.
-
Follow the instructions in UsingGradle.adoc to convert the AsciiDoc files in the
docs/directory to HTML format. -
Go to your generated HTML files in the
build/docsfolder, right click on them and selectOpen with→Google Chrome. -
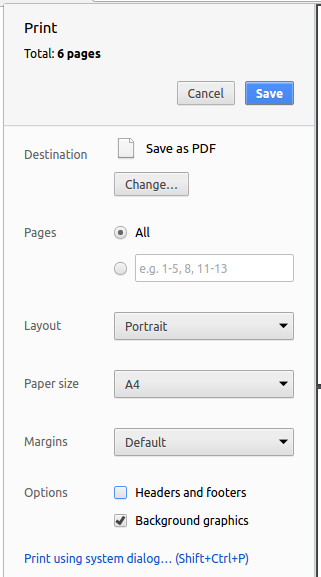
Within Chrome, click on the
Printoption in Chrome’s menu. -
Set the destination to
Save as PDF, then clickSaveto save a copy of the file in PDF format. For best results, use the settings indicated in the screenshot below.
4.4. Site-wide Documentation Settings
The build.gradle file specifies some project-specific asciidoc attributes which affects how all documentation files within this project are rendered.
Attributes left unset in the build.gradle file will use their default value, if any.
|
| Attribute name | Description | Default value |
|---|---|---|
|
The name of the website. If set, the name will be displayed near the top of the page. |
not set |
|
URL to the site’s repository on GitHub. Setting this will add a "View on GitHub" link in the navigation bar. |
not set |
|
Define this attribute if the project is an official SE-EDU project. This will render the SE-EDU navigation bar at the top of the page, and add some SE-EDU-specific navigation items. |
not set |
4.5. Per-file Documentation Settings
Each .adoc file may also specify some file-specific asciidoc attributes which affects how the file is rendered.
Asciidoctor’s built-in attributes may be specified and used as well.
Attributes left unset in .adoc files will use their default value, if any.
|
| Attribute name | Description | Default value |
|---|---|---|
|
Site section that the document belongs to.
This will cause the associated item in the navigation bar to be highlighted.
One of: * Official SE-EDU projects only |
not set |
|
Set this attribute to remove the site navigation bar. |
not set |
4.6. Site Template
The files in docs/stylesheets are the CSS stylesheets of the site.
You can modify them to change some properties of the site’s design.
The files in docs/templates controls the rendering of .adoc files into HTML5.
These template files are written in a mixture of Ruby and Slim.
|
Modifying the template files in |
5. Testing
5.1. Running Tests
There are three ways to run tests.
| The most reliable way to run tests is the 3rd one. The first two methods might fail some GUI tests due to platform/resolution-specific idiosyncrasies. |
Method 1: Using IntelliJ JUnit test runner
-
To run all tests, right-click on the
src/test/javafolder and chooseRun 'All Tests' -
To run a subset of tests, you can right-click on a test package, test class, or a test and choose
Run 'ABC'
Method 2: Using Gradle
-
Open a console and run the command
gradlew clean allTests(Mac/Linux:./gradlew clean allTests)
| See UsingGradle.adoc for more info on how to run tests using Gradle. |
Method 3: Using Gradle (headless)
Thanks to the TestFX library we use, our GUI tests can be run in the headless mode. In the headless mode, GUI tests do not show up on the screen. That means the developer can do other things on the Computer while the tests are running.
To run tests in headless mode, open a console and run the command gradlew clean headless allTests (Mac/Linux: ./gradlew clean headless allTests)
5.2. Types of tests
We have two types of tests:
-
GUI Tests - These are tests involving the GUI. They include,
-
System Tests that test the entire App by simulating user actions on the GUI. These are in the
systemtestspackage. -
Unit tests that test the individual components. These are in
seedu.url.uipackage.
-
-
Non-GUI Tests - These are tests not involving the GUI. They include,
-
Unit tests targeting the lowest level methods/classes.
e.g.seedu.url.commons.StringUtilTest -
Integration tests that are checking the integration of multiple code units (those code units are assumed to be working).
e.g.seedu.url.storage.StorageManagerTest -
Hybrids of unit and integration tests. These test are checking multiple code units as well as how the are connected together.
e.g.seedu.url.logic.LogicManagerTest
-
5.3. Troubleshooting Testing
Problem: HelpWindowTest fails with a NullPointerException.
-
Reason: One of its dependencies,
HelpWindow.htmlinsrc/main/resources/docsis missing. -
Solution: Execute Gradle task
processResources.
6. Dev Ops
6.1. Build Automation
See UsingGradle.adoc to learn how to use Gradle for build automation.
6.2. Continuous Integration
We use Travis CI and AppVeyor to perform Continuous Integration on our projects. See UsingTravis.adoc and UsingAppVeyor.adoc for more details.
6.3. Coverage Reporting
We use Coveralls to track the code coverage of our projects. See UsingCoveralls.adoc for more details.
6.4. Documentation Previews
When a pull request has changes to asciidoc files, you can use Netlify to see a preview of how the HTML version of those asciidoc files will look like when the pull request is merged. See UsingNetlify.adoc for more details.
6.5. Making a Release
Here are the steps to create a new release.
-
Update the version number in
MainApp.java. -
Generate a JAR file using Gradle.
-
Tag the repo with the version number. e.g.
v0.1 -
Create a new release using GitHub and upload the JAR file you created.
6.6. Managing Dependencies
A project often depends on third-party libraries. For example, Wish Book depends on the Jackson library for XML parsing. Managing these dependencies can be automated using Gradle. For example, Gradle can download the dependencies automatically, which is better than these alternatives.
a. Include those libraries in the repo (this bloats the repo size)
b. Require developers to download those libraries manually (this creates extra work for developers)
Appendix A: Product Scope
Target user profile:
-
has a need to manage savings for a significant number of items to buy
-
prefer desktop apps over other types
-
can type fast
-
prefers typing over mouse input
-
is reasonably comfortable using CLI apps
Value proposition: manage savings faster than a typical mouse/GUI driven app
Appendix B: User Stories
Priorities: High (must have) - * * *, Medium (nice to have) - * *, Low (unlikely to have) - *
| Priority | As a … | I want to … | So that I can… |
|---|---|---|---|
|
new user |
see usage instructions |
refer to instructions when I forget how to use the App |
|
user |
add a new wish |
keep track of the things I want to purchase |
|
user |
add savings to selected wishes |
make faster progress towards certain wishes |
|
user |
delete a wish |
remove items that I no longer need |
|
user |
find a wish by name |
locate details of a wish without having to go through the entire list |
|
user |
view all fulfilled wishes |
so I can keep track of items I have bought |
|
user |
view all past savings for my wishes |
have a better idea of my saving habits in general |
|
user |
view all my wishes |
monitor the progress I have made in all my wishes |
|
user |
undo past commands |
reverse wrong commands |
|
user |
distribute a saving to a few wishes |
make equal progress to a few of my wishes |
|
user |
rank my wishes |
prioritise certain wishes over others so that money can be allocated accordingly |
|
user |
transfer money from one wish to another |
progress towards other wishes faster |
|
user |
withdraw from savings |
spend the money if need be |
|
user |
reorder the priority of a wish |
fulfil the specified wish faster |
|
user |
save money without a wish |
allocate my savings to a wish later |
|
user |
receive email reminders about wishes that are due |
be more mindful of my savings to fulfil wishes |
|
user |
view all past savings for a particular wish |
have a better idea of my saving habits for a wish |
Appendix C: Use Cases
(For all use cases below, the System is the WishBook and the Actor is the user, unless specified otherwise)
Use case: Add wish
MSS
-
Actor enters a wish with Name, Date, Price.
-
System adds wish to the wish list.
Use case ends.
Extensions
-
2a. Actor fails to specify any of the compulsory fields (Name, Price, and Date/Duration).
-
2a1. System shows a correct Add command usage with example.
Use case ends.
-
-
2b. Actor enters incorrectly formatted arguments.
-
2b1. System shows Add command usage.
-
2b2. Actor is prompted to enter a valid argument in a specific format shown.
Use case ends.
-
Use case: Delete wish
MSS
-
Actor requests to list wishes.
-
System shows a list of wishes.
-
Actor requests to delete a specific wish in the list.
-
System deletes the wish.
Use case ends.
Extensions
-
2a. The list is empty.
Use case ends.
-
3a. The given index is invalid.
-
3a1. System shows an error message.
Use case resumes at step 2.
-
3b1. Wish requested to be deleted has a non-zero savings amount.
-
3b2. System displays warning to user that wish to be deleted has a non-zero savings amount.
Use case resumes at step 2.
-
Use case: Edit wish
MSS
-
Actor requests to edit wish.
-
System updates wish and shows updated wish to Actor.
Use case ends.
Extensions
-
1a. System has no recorded wishes.
-
1a1. Actor is prompted to add a wish.
Use case ends.
-
-
1b. Actor enters invalid arguments
-
1b1. System shows Edit command usage.
-
1b2. Actor is prompted to enter a valid argument.
Use case ends.
-
Use case: Find wishes
MSS
-
Actor specifies the search predicate.
-
System shows all wishes matching the given search predicate.
Use case ends.
Extensions
-
1a. System has no recorded wishes.
-
1a1. System shows dialog notifying Actor that no relevant results can be found.
Use case ends.
-
-
1b. Actor enters invalid arguments
-
1b1. System shows Find command usage.
-
1b2. Actor is prompted to enter a valid argument.
Use case ends.
-
-
1c. System unable to find any matching wishes.
-
1c1. System shows dialog notifying Actor that no relevant results can be found.
Use case ends.
-
-
1d. Actor enters empty prefixes for arguments.
-
1c1. System shows all wishes in the WishBook.
Use case ends.
-
Use case: Move amount between wishes
MSS
-
Actor specifies the origin wish index, the destination wish index, and amount to move.
-
System moves specified amount from origin wish to destination wish.
Use case ends.
Extensions
-
1a. System has no recorded wishes.
-
1a1. Actor is prompted to add a wish.
Use case ends.
-
-
1b. Actor enters invalid arguments.
-
1b1. System shows Move command usage.
-
1b2. Actor is prompted to enter a valid argument.
Use case ends.
-
-
1c. Actor enters the same index for origin wish and destination wish.
-
1c1. System shows Move command usage.
-
1c2. Actor is prompted to enter a valid argument.
Use case ends.
-
-
1d. The amount to move is greater than the existing saved amount in the origin wish.
-
1d1. System reports that saved amount of wish cannot become negative.
Use case ends.
-
-
1e. The amount moved to destination wish exceeds the amount needed to fulfil the wish.
-
1e1. System moves to destination wish the required amount needed to fulfil it.
-
1e2. System moves the excess amount to unused funds.
Use case ends.
-
-
1f. Actor specifies unused funds as the origin wish.
-
1f1. System moves amount from unused funds to the destination wish.
Use case ends.
-
-
1g. Actor specifies unused funds as the destination wish.
-
1g1. System moves amount from origin wish to unused funds.
Use case ends.
-
Use case: Save money for a wish
MSS
-
Actor enters X amount of money to be saved.
-
System transfers X to the wish with the specified index.
Use case ends.
Extensions
-
1a. Actor specifies to allocate the money to unused funds.
-
1a1. System adds X to unused funds.
Use case ends.
-
-
1b. System has no recorded wishes.
-
1b1. Actor is prompted to add a wish.
Use case ends.
-
-
1c. Actor enters an invalid value of money to be saved.
-
1c1. Actor is prompted to enter a valid value.
Use case ends.
-
-
1d. Actor enters an amount of money that causes the wish’s saved amount to exceed the amount needed to fulfil the wish.
-
1d1. System adds the required amount to fulfil the saved amount of the wish at the specified index.
-
1d2. System adds the excess amount to unused funds.
Use case ends.
-
-
1e. Actor enters an amount that causes the wish’s resulting saved amount to become negative.
-
1e1. Actor is prompted to enter a valid value.
Use case ends.
-
Use case: View all wishes
MSS
-
Actor requests to view all wishes.
-
System shows all wishes.
Use case ends.
Extensions
-
1a. System has no recorded wishes.
-
1a1. User is prompted to add a wish.
Use case ends.
-
-
1b. System has no recorded wishes.
-
1b1. System shows dialog notifying Actor that there are no such wishes.
Use case ends.
-
Use case: View uncompleted wishes
MSS
-
Actor requests to view uncompleted wishes.
-
System shows all uncompleted wishes.
Use case ends.
Extensions
-
1a. System has no recorded uncompleted wishes.
-
1a1. User is prompted to add a wish.
Use case ends.
-
-
1b. System has no recorded uncompleted wishes.
-
1b1. System shows dialog notifying Actor that there are no such wishes.
Use case ends.
-
Use case: View completed wish list
MSS
-
Actor requests to list completed wishes.
-
System shows a list of completed wishes.
Use case ends.
Extensions
-
2a. List is empty.
Use case ends.
Use case: View command history
MSS
-
Actor requests to view history of commands entered.
-
System shows all commands entered.
Use case ends.
Extensions
-
1a. System has no recorded commands.
-
1a1. User is prompted to enter a command.
Use case ends.
-
Use case: View savings history
MSS
-
Actor requests to view history of savings entered.
-
System shows all savings entered, from newest to oldest.
Use case ends.
Extensions
-
1a. System has no recorded savings.
-
1a1. User is prompted to enter a saving.
Use case ends.
-
Appendix D: Non Functional Requirements
-
Should work on any mainstream OS as long as it has Java
9or higher installed. -
Should be able to hold up to 1000 wishes without user experiencing a drop in application performance.
-
A user with above average typing speed for regular English text (i.e. not code, not system admin commands) should be able to accomplish most of the tasks faster using commands than using the mouse.
-
User data can be transferred across different machines (of different platforms).
-
The software should not use a DBMS (Database Management System) to store data.
-
User data is stored locally.
-
User data is human readable and can be edited.
-
Friendly towards color-blind users.
-
Command Line Interface (CLI) is the primary mode of input. GUI is used mainly for visual feedback rather than to collect input. Usage of mouse should be minimized.
-
The software should follow the Object-Oriented Paradigm.
-
The software should work without requiring an installer.
Appendix F: Instructions for Manual Testing
Given below are instructions to test the app manually.
| These instructions only provide a starting point for testers to work on; testers are expected to do more exploratory testing. |
F.1. Launch and Shutdown
-
Initial launch
-
Download the jar file and copy into an empty folder
-
Double-click the jar file
Expected: Shows the GUI with a set of sample contacts. The window size may not be optimum.
-
-
Saving window preferences
-
Resize the window to an optimum size. Move the window to a different location. Close the window.
-
Re-launch the app by double-clicking the jar file.
Expected: The most recent window size and location is retained.
-
F.2. Deleting a wish
-
Deleting a wish while all wishes are listed
-
Prerequisites: List all wishes using the list command. Multiple wishes in the list. Wish at index 1 should be fulfilled.
-
Test case:
delete 1
Expected: First wish is deleted from the list. Details of the deleted wish shown in the status message. Unused funds will not be updated as the product has already been bought. Deleted wish details and amount in unused funds shown in status message. Timestamp in the status bar is updated. -
Test case:
delete 2
Expected: Second wish is deleted. Money in the wish will be transferred to unused funds. Deleted wish details and amount in unused funds shown in status message. Timestamp in the status bar is updated. -
Test Case:
delete
Expected: Error. Invalid command format message shown in unused funds. -
Test Case:
delete -1
Expected: Error. Invalid command format message shown in unused funds. -
Other incorrect delete commands to try:
delete x(where x is larger than the list size)
Expected: Error. Invalid wish provided message in message status.
-
F.3. Saving to a wish
-
Saving to a wish
-
Prerequisites: Add a new wish with the add command with a date earlier than the earliest wish in the WishBook. If the current date is past the earliest wish’s date, delete the first wish until this is no longer true and then add a new wish earlier than the earliest wish in the WishBook.
-
Test case:
save 1 0
Expected: 0.00 saved to first wish. Details of saved amount and the remaining amount left for completion shown in the status message. Timestamp in the status bar is updated. -
Test case:
save 1 0.01
Expected: 0.01 saved to first wish. Details of saved amount and the remaining amount left for completion shown in the status message. Timestamp in the status bar is updated. -
Test case:
save 1 -0.01
Expected: 0.01 removed from first wish. Details of removed amount and the remaining amount left for completion shown in the status message. Timestamp in the status bar is updated. -
Test case:
save 1 [VALUE LARGER THAN WISH PRICE]
Expected: Wish will be 100% and fulfilled. Details of the excess amount saved and the unused funds value shown in status message. -
Test case:
save 1 5
Expected: Unable to save to wish. Wish already fulfilled message shown in status message. Timestamp in status bar is updated. -
Other incorrect delete commands to try:
save 2 0.001,save 2 12.,save 2 12@
Expected: Similar to previous.
-
F.4. Moving funds between wishes
-
Moving funds between 2 wishes:
-
Prerequisites: Wish at index 1 should be fulfilled. If it is not,
saveuntil it is. The other wishes used in the subsequent commands should not be fulfilled. -
Test case:
move 1 2 50
Expected: No money moved from wish 1 to 2. Wish already fulfilled status message shown. -
Test case:
move 2 3 [AMOUNT SMALLER THAN SAVED AMOUNT AT FROM_INDEX]
Expected: Specified amount moved from wish 2 to wish 3. Moved message shown in status message. Timestamp in status bar is updated. -
Test case:
move 2 3 [AMOUNT LARGER THAN SAVED AMOUNT AT FROM_INDEX]
Expected: No money moved from wish 1 to 2.FROM_INDEXdoes not contain the specified amount shown in status message. -
Test case:
move 2 3 [AMOUNT LARGER THAN SAVED AMOUNT AT TO_INDEX]
Expected: Money moved from wish 2 to 3. Wish 3 is fulfilled. Excess money goes to unused funds(index 0). Moved amount, excess and updated unused funds shown in status message. Timestamp in status bar is updated. ed. Incorrect move commands to try:move 2 3 -50,move 2 3 0.0001Expected: No money will be moved. Appropriate error message shown in status message.
-
F.5. Adding a wish
-
Adding to a wish
-
Positive test cases
-
Prerequisites: None. Duplicate Wishes can exist and have the same user-defined properties.
-
Test case:
add n/PS4 Golden Pro d/25/12/2018 p/499.99
Expected: A new Wish named “PS4 Golden Pro”, priced at $499.99, and expiry date set to 25th December 2018, default URL of “www.amazon.com” will be added to the list of Wishes. Status message shows the details of the newly added Wish. -
Test case:
add n/PS4 Golden Pro d/25/12/2018 p/499.99 t/technology
Expected: A new Wish named “PS4 Golden Pro”, priced at $499.99, and expiry date set to 25th December 2018, default URL of “www.amazon.com”, with a tag named “technology”, will be added to the list of Wishes. Status message shows the details of the newly added Wish. Selecting on the newly added Wish will also bring up the Amazon’s homepage on the right side of the Detail Panel. -
Test case:
add n/PS4 Golden Pro a/60d p/499.99
Expected: A new Wish named “PS4 Golden Pro”, priced at $499.99, and expiry date set to your current date plus 60 days, default URL of “www.amazon.com” will be added to the list of Wishes. Status message shows the details of the newly added Wish. Selecting on the newly added Wish will also bring up the Amazon’s homepage on the right side of the Detail Panel. -
Test case:
add n/PS4 Golden Pro a/2y p/499.99 u/www.google.com
Expected: A new Wish named “PS4 Golden Pro”, priced at $499.99, and expiry date set to your current date plus 2 years, default URL of “www.amazon.com” will be added to the list of Wishes. Status message shows the details of the newly added Wish. Selecting on the newly added Wish will also bring up the Google search engine webpage on the right side of the Detail Panel.
-
-
Negative test cases
-
Prerequisites: None.
-
Test case:
add n/PS’4 Golden Pro a/30d p/499.99
Expected: Status message shows that a Wish’s name can only contain alphanumeric numbers and spaces, and should not be blank. -
Test case:
add n/ a/30d p/499.99
Expected: Status message shows that a Wish’s name can only contain alphanumeric numbers and spaces, and should not be blank. -
Test case:
add n/PS4 Golden Pro a/30d3y p/499.99
Expected: Status message shows the given time format is invalid, and also shows the user’s time input. -
Test case:
add n/PS4 Golden Pro d/30.30.9999 p/499.99
Expected: Status message shows that the time should be of format: dd/mm/yy. -
Test case:
add n/PS4 Golden Pro a/3d p/499.9999999
Expected: Status message states that price value should only contain numbers, and at most two numbers after the decimal point. -
Test case:
add n/PS4 Golden Pro a/3d p/abc.de
Expected: Status message states that price value should only contain numbers, and at most two numbers after the decimal point. -
Test case:
add n/PS4 Golden Pro a/-1d p/22.22
Expected: Status message states that the given expiry date should be after the current date. -
Test case:
add n/PS4 Golden Pro d/25/12/1111 p/22.22
Expected: Status message states that the given expiry date should be after the current date. -
Test case:
add n/PS4 Golden Pro a/1d
Expected: Status message states that this is an invalid command format, and shows the correct usage of add command. -
Test case:
add n/PS4 Golden Pro d/25/12/2018 p/22.22 u/abc def.com
Expected: Status message states that URLs cannot have whitespaces.
-
F.6. Listing out wishes
-
Listing out wishes in the list
-
Prerequisites: Have both completed (amount saved more than price) and uncompleted wishes.
-
Test case:
list
Expected: All wishes in WishBook is listed. -
Test case:
list -c
Expected: Only wishes that are completed will be shown on the list. -
Test case:
list -u
Expected: Only wishes that are uncompleted will be shown on the list.
-
F.7. Finding wishes
-
Finding a wish by name, tags or remark:
-
Prerequisites: None
-
Test case:
find r/Alice
Expected: Returns all the wishes whose remark contains “Alice” case insensitive. Number of wishes found is listed in status message. Only matched wishes visible in WishList. -
Test case:
find t/neigh t/paren
Expected: Returns all the wishes whose tags contain the keywords “neigh” or “paren”. Number of wishes found is listed in status message. Only matched wishes visible in WishList. -
Test case:
find n/EVG t/PS
Expected: Returns all wishes whose name contains “EVG” and whose tag contains “PS” case insensitve. Number of wishes found is listed in status message. Only matched wishes visible in WishList. -
Test case:
find n/EVG n/PS t/neigh t/paren
Expected: Returns all wishes whose name contains (“EVG” or “PS”) and (“neigh” or “paren”). Number of wishes found is listed in status message. Only matched wishes visible in WishList. -
Test case:
find
Expected: Invalid command. Invalid command format message shown in status message. -
Other incorrect delete commands to try:
find test,find d/22/10/1996.
Expected: Similar to previous.
-
F.8. Saving data
-
Dealing with missing/corrupted data files
-
Prerequisites: content of WishBook.xml and wishTransaction.xml files will be used to load data for a new session of WishBook. If data is missing from any of these files, data will be lost from subsequent sessions of WishBook unless the xml file data is restored and in proper format.
-
Test case (gracefully exiting app assuming that WishBook contains more than 1 wish):
save 1 10and thenexit
Expected: when a new session is started, WishBook should contain all wishes from the previous session. Wish in which the save command is performed for should have its saving history and save amount updated. -
Test case (WishBook data and wishTransaction data should be backed up everytime the state of WishBook changes):
save 1 10
Expected: assuming WishBook contains more than 1 wish, the execution of the save command should cause the WishBook.xml and wishTransaction.xml files to be updated with a new save amount. -
Test case (empty WishBook to simulate missing data) Copy the contents of the empty xml file after executing the clear command to simulate missing file data into WishBook.xml at the file path specified in the save location (which is specified in the preferences.json file)
Expected: When the WishBook is loaded, all wish data should be absent. -
Test case (corrupted data): delete data for 1 wish currently in WishBook by editing the WishBook.xml file.
Expected: assuming that the data format of the xml file is valid, WishBook should load the content of the WishBook based on the data present in WishBook.xml file (without the deleted wish data). If the data format of the xml file is invalid the WishBook will not load properly and an error message should appear.
-